|
PatternMaker Sewing Projects
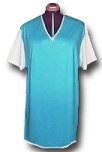
Sewing Pajamas
Here you get instructions of how this garment was designed and sewn.
I used tricot as the fabric but the garment has enough ease to be sewn
of non-elastic fabric as well. Of course, this model could also can be
used as a T-shirt-shorts-combination, if you want to.
The design of this garment is a very simple one. I only
used two-color fabrics strips to finish the neck opening, sleeve ends
and leg ends. For the sleeves I used fabric of contrasting color.
Which patterns to use?
 Use
the
women's basic macros for pants and shirt.
Make the alterations to the patterns according to the picture.
The alterations can be done manually after you have printed the patterns
or using PM editing tools before printing, whichever method you feel more
comfortable. Use
the
women's basic macros for pants and shirt.
Make the alterations to the patterns according to the picture.
The alterations can be done manually after you have printed the patterns
or using PM editing tools before printing, whichever method you feel more
comfortable.
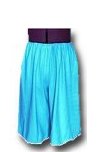
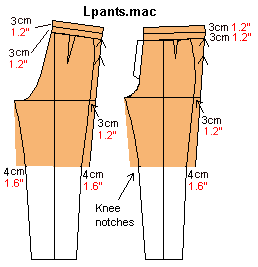
The pants
were cut to knee length and the legs made 4 cm (1.6") wider on both
sides of the knee. At the crotch height the legs were made 3 cm (1.2")
wider at side seams. The waistband for an elastic waist construction was
cut to the top edge of the pants. Leave darts, pockets and zipper facing
off.
For
the top part
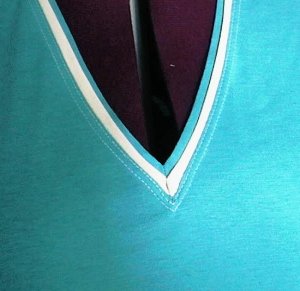
of the pajamas the shirt macro was used. The neck opening was
cut to V-shape, refer to the picture. The button extension was left off.
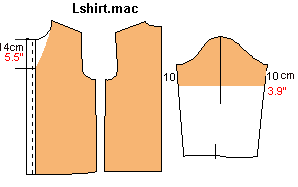
Alternatively you can use the jacket or the dress and the
pants macros included in the women's second macro collection (picture
below). The L2-jacket and the L2-dress macros
have (among other things) options for V-shape neck and dropped
sleeve. I made the top part rather long, 40 cm (15.5") from waist
to hem because I like to hide my non-existing waist in long and straight
tops. If you use the shirt macro where the length of the garment cannot
be typed in, please check the length and if you want to, make the garment
longer or shorter by moving the hem vertices.
Remove the back shoulder dart as in the picture.
The L2-pants.mac has an option for (normal,
tight and) wide legs as well as an option for elastic waist so the legs
of these patterns do not need any widening at the hip and at the waist
(picture below). These options are also included in the women's
supermacro for pants . If you have that macro, you can use it.

Sewing
The only decoration in this garment are the neck opening
and the hems finished with a two-colored fabric stripe made from the fabric
used for the garment.
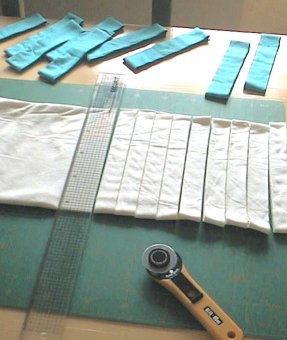
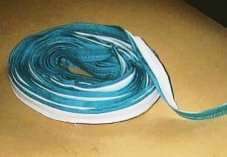
To make the two-colored fabric stripe, I have cut strips
from the turquoise fabric in width of 5 cm (2") and from the white
fabric in width of 3 cm (1.2"). I love to use the rotary cutter and
mat for this kind of works. It makes it easy to cut strips that are exactly
of the width you want to.
Join the strips to a long continuous strip sewing them
together with narrow seam allowances. Iron the seams. Machine-baste these
strips together folded lengthwise in two and the raw edges matching (picture
below).
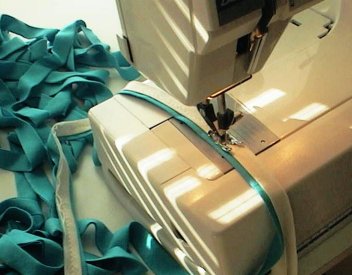
I found it easier first to iron the wider strip in two
and then basting the narrower strip to it folding the narrower strip when
basting.

As a result you get a two-colored fabric strip to be used
for the finishing of the edges of the garment.
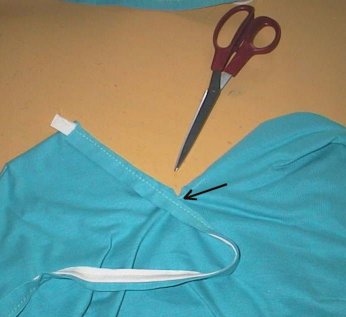
After having sewn one shoulder seam sew the two-colored
strip to the neck opening. After having done this clip the seam allowance
at the neck opening at the V-neck corner. Sew a small dart at the V-neck
corner.
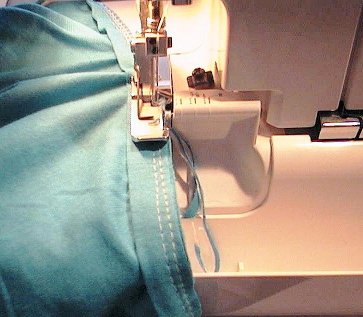
I used a serger to connect the stripe to the neck opening.
If you don't have a serger, sew the strip to the neck opening with a sewing
machine using a narrow zigzag-stitch and overlock the seam with wider
zigzack. After having fastened the stripe to the neck opening sew the
other shoulder seam.
Sew the stripe to the sleeve ends correspondingly and fasten
the sleeves to the armscyes. Sew one sleeve seam and one side seam continuously
from sleeve end to hem. Fasten the two-colored stripe to the hem. Then
sew the other sleeve seam and side seam.
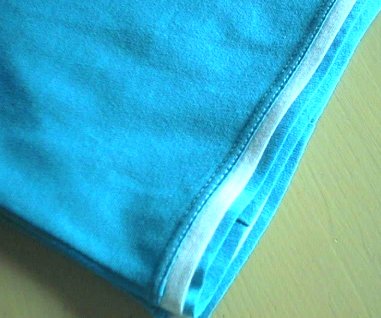
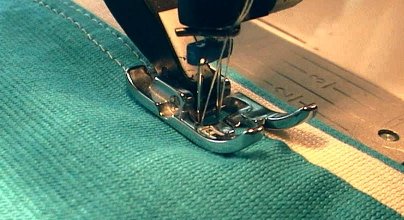
Fold the seam allowances of all two-colored stripes inside
and topstitch the garment from the right side using a double needle (picture
below).
Sew front and back crotch seams and both side seams of
the pants. Fasten the two-colored stripe to the leg ends and topstitch
with double needle from the right side of the garment. Then sew the inside
seams of the legs continuously from one leg end to the other.
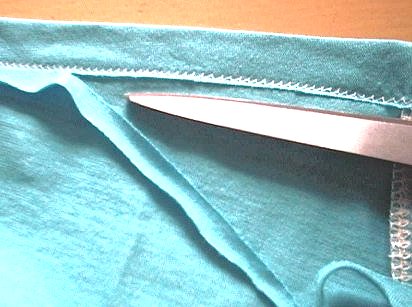
Fold in the casing for the elastic at the top of the pants
and fasten it with double needle on the right side. Cut away the excess
seam allowance from the wrong side (picture below). Leave a small opening
for threading the elastic. Thread the elastic and close the opening for
the elastic.
Copyright 1999 Leena Lähteenmäki, Järenpää,
Finland
| 