|
PatternMaker Sewing Projects
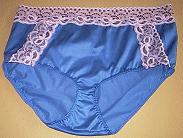
Women's Panties
For sewing instructions for PatternMaker macro collection for women's
lingerie,  click here
.
click here
.
If you do not have the patterns
If you do not have patterns for panties to your own measurements or
do not own PatternMaker
women's lingerie macro collection
,
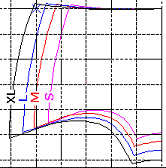
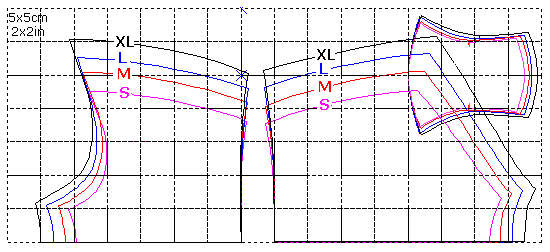
miniature patterns in S, M, L and XL sizes are provided here.
Click
here to see and print the miniature patterns.
Copy and resize the patterns to pattern paper. Please note the
grid size of 5X5 cm (2X2").
 Important!
The patters include
seam allowances of 0,7cm (1/4"). Waist allowance is 4 cm (
1.5" ). Important!
The patters include
seam allowances of 0,7cm (1/4"). Waist allowance is 4 cm (
1.5" ).
Important! Use
elastic fabric to the panties sewn with these patterns.
|
Body measurements used in the patterns
Hip circumference
|
|
S
|
91 cm
|
36"
|
|
M
|
101 cm
|
40"
|
|
L
|
112 cm
|
44"
|
|
XL
|
122 cm
|
48"
|
At the PatternMaker Website you can download the patterns in full size as a PatternMaker file . With your PatternMaker you can print the patterns
in full size and erase the sizes you do not need.
If you do not have any PatternMaker program, you can download the
freeware version free of charge from the
website of PatternMaker Software
. With the free program version you can print the patterns.
If you have
PatternMaker Home , you can change the patterns using PatternMaker
CAD-tools.
General sewing instructions for lingerie
Seams
Sew the seams with
medium zigzag stitch and medium stitch length. The seams do not
need to be overlocked, if you do not want to, because lingerie jersey
does not ravel. If you own a
serger , sew seams with it.
Seam allowances
Important! Please note that the
miniature patterns include
seam allowances of 0,7cm (1/4"). Waist allowance is 4 cm (
1.5" ). These seam allowances are also in the patterns dowloaded
from this page as a PatternMaker file.
When cutting the garment pieces add a 0.7 cm (1/4")
seam allowance . After having sewn the seams trim them to their
half width.
Waist
If you use
stretch lace to finish the waist of the panties, add to the waist
of the panties seam allowance equal to the width of the lace. If you use
elastic to finish the waist , add a seam allowance equal to double
width of the elastic + seam allowance. The best width for waist elastic
is 1.5-3 cm (1/2" - 1").
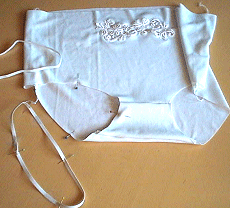
Cut the
crotch piece of the panties in two, one from natural fiber fabric,
e.g. from cotton knit. It will be on the inside of the panties and feels
much better against your body than fabrics made of synthetic fibers.
 1.
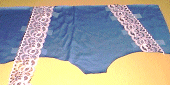
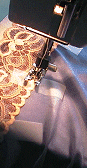
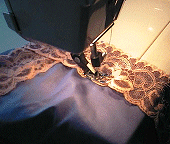
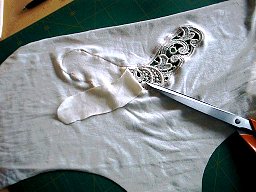
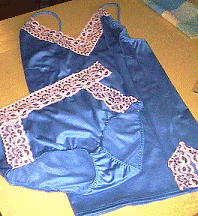
Applying lace inserts 1.
Applying lace inserts
Plan the placement of the lace inserts on the pants front. Experiment
the best position of lace motifs. If you use symmetrical lace inserts,
place also the motifs symmetrically. Tape lace in place and stitch along
edges through tape with narrow zigzag. Remove tape. Cut away fabric under
the lace.
Note! Because you are using stretchy fabric
to the panties also the laces have to be stretchy. That way the lace will
behave in the same way as the fabric when the panties are worn.
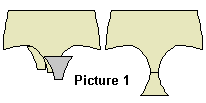
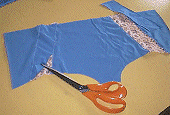
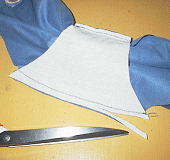
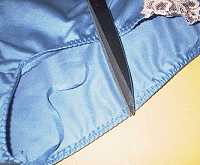
2. Sewing the crotch
Sandwich the front piece of the panties between the crotch pieces right
sides together and sew with narrow zigzag through the three fabric layers.
(
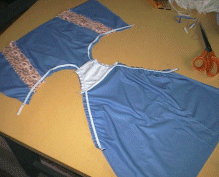
Picture 1 ) Trim seam allowance close to stitches. Roll the front
and the back pieces of the panties inside the crotch pieces as in the
photos and sew the back seam of the crotch through all layers
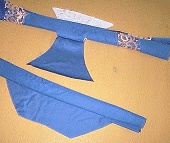
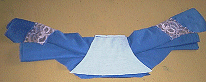
 Trim
seam allowances and turn the crotch right side out. Trim
seam allowances and turn the crotch right side out.
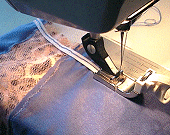
3. Basting elastics to the leg openings
Machine baste the elastics to the
wrong side of the leg openings. Stretch the elastic lightly as
you sew. Special pressing feet can be bought for applying elastic to garments.
 You'll soon learn, however, to stretch the elastic appropriately
even without a special pressing foot. The aim is not to stretch
the elastic too taut. The leg openings have been drafted according to
your measurements. Without an edge elastic the leg openings would, however,
flutter without control.
You'll soon learn, however, to stretch the elastic appropriately
even without a special pressing foot. The aim is not to stretch
the elastic too taut. The leg openings have been drafted according to
your measurements. Without an edge elastic the leg openings would, however,
flutter without control.
Sew
a
couple of
tests to find out how much to stretch the elastic to get the desired
amount of gathering.
Baste the elastic close to edge to
wrong side of a piece of fabric. Turn the fabric and the elastic
once in and stitch on top of it on
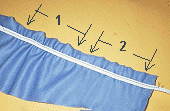
right side with 3-stitch zigzag . Examine the amount of gathering.
In the photo to the left there is too much gathering in the first half
of the test
(1) , in the second half of the test
(2) the amount of the gathering is good. The need to stretch the
elastic depends of the stretchability of the elastic you are using.
 Compare
the test result with ready-made lingerie and try to achieve a similar
result. But make the comparison only after you have sewn the 3-stitch
zigzag on the elastic on right side of the fabric and trimmed away the
excess seam allowance on wrong side of the fabric. Compare
the test result with ready-made lingerie and try to achieve a similar
result. But make the comparison only after you have sewn the 3-stitch
zigzag on the elastic on right side of the fabric and trimmed away the
excess seam allowance on wrong side of the fabric.
Note! It is important that the elastics
are
equally long in both leg openings . Therefore, after having basted
the elastic to the first leg opening, measure the length of the elastic
and cut an equally long elastic for the other leg opening.
 An
alternative is to cut two pieces of elastic long enough to feel good
when fitted around the subjects thigh at the place where the panties leg
opening will be and to pin the elastics to the leg openings with equal
intervals before basting them to their places. An
alternative is to cut two pieces of elastic long enough to feel good
when fitted around the subjects thigh at the place where the panties leg
opening will be and to pin the elastics to the leg openings with equal
intervals before basting them to their places.
 When sewing the sample garment I have used
No Hands Elastic Wizard which I have ordered from Clotilde's Web
Shop where it costs US$ 28. If you want to get there, please
click
here
.
When sewing the sample garment I have used
No Hands Elastic Wizard which I have ordered from Clotilde's Web
Shop where it costs US$ 28. If you want to get there, please
click
here
.
4. Sewing side seams
Sew the side seams of the panties and if needed, trim the seam allowances.
5. Finishing the leg openings
Turn the seam allowances of the leg openings with elastics to the wrong
side of the garment and sew on top of the elastics on the right side with
3-stitch zigzag. Stretch lightly when sewing but don't pull. Trim away
the excess seam allowance on the wrong side of the garment.
 You
do not need to remove the basting stitches from the leg openings. They
will break when you wear the panties and will vanish by themselves. You
do not need to remove the basting stitches from the leg openings. They
will break when you wear the panties and will vanish by themselves.
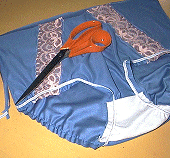
6. Applying stretchy lace to the waist
In the sample garment stretchy lace has been used to finish the waist.
Baste it right side up on right side of the garment waist. Match the scalloped
edge to the raw edge of the panties waist (you do remember that you have
cut to the panties waist a seam allowance corresponding to the width of
the stretchy lace).
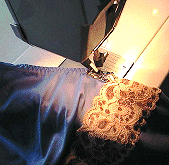
 Baste
along the inner edge of the lace around the waist. Overlap lace ends
leaving excess length. Stretch the lace when basting. Using narrow zigzag
stitch across the inner edge of the lace from right side through all layers.
Trim away excess allowance on the wrong side of the garment. Baste
along the inner edge of the lace around the waist. Overlap lace ends
leaving excess length. Stretch the lace when basting. Using narrow zigzag
stitch across the inner edge of the lace from right side through all layers.
Trim away excess allowance on the wrong side of the garment.
Using narrow zigzag stitch through the overlapped layers of lace. Follow
motif if possible. Trim away excess lace from both sides of the garment.
If you use
waist elastic to finish the waist,
baste it to the wrong side of the waist. Match the top edge of
the elastic to the raw edge of the panties waist. Leave seam allowance
over. Stretch when basting.
Fold the elastic to the wrong side of the garment. Sew on the
right side of the garment through the inner edge of the elastic with
3-stitch zigzag. Trim away excess fabric on the wrong side of the
garment.
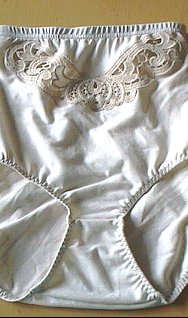
More design ideas for panties

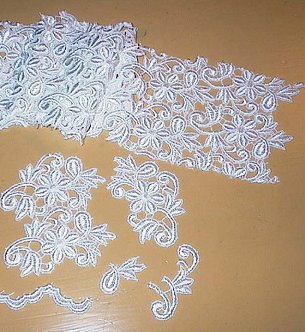
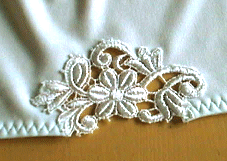
Applying lace to edge of garment
You can cut one or more
motifs from lace
fabric to decorate the edges of the garment as in the photos below.
First finish the edge with elastic. Then tape the lace motif on top of
the edge and sew with narrow zigzag along the edges of the lace motif.
Finally, trim away fabric (and the edge elastic) under the lace motif
on the wrong side.
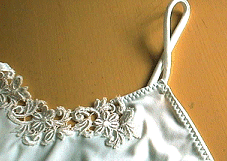
 Applying
lace in the middle of the garment Applying
lace in the middle of the garment
You can apply a lace appliqué also in the
middle of the garment. Tape it on the fabric, zigzag along the
edges and trim away fabric under the lace on the wrong side of the garment.
Hint: Consider applying lace appliqués
also to other garments than lingerie garments, e.g. to front, collar or
cuff of a blouse.
 Applying lace on top of a seam
You can even apply lace
on top of a seam in which case you can replace the seam with lace.
Sew the seam and, if necessary overlock it. Tape the lace on top of the
seam, zigzag along edges and trim away fabric (inclusive seam) under the
lace on the wrong side.
Apply lace insert at hem
Apply lace on top of the hem seam. Fold hem allowance to the wrong side
of the garment. Baste. Tape lace on top of the basted edge. Using narrow
zigzag sew along the edges of the lace. Trim away fabric under the lace
on the wrong side of the garment.
See also ...
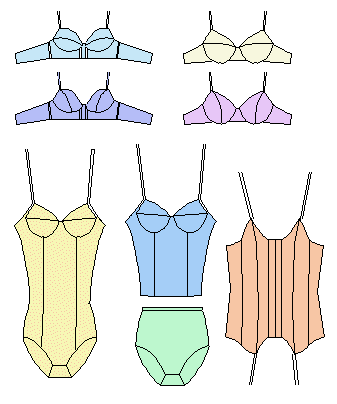
There also is a PatternMaker sewing project for a matching camisole.
You'll get instructions of how to draft the patterns using the basic
bodice patterns as a starting point. Detailed sewing instructions with
photos will be provided.
Click
here or use the link at the top of the page.
A couple of Internet addresses
If you have difficulties in getting fabrics and notions for lingerie,
please refer to the following websites
Spandex House
SewSassy
Full & Sassy Pattern Boutique
Clotilde
Nancy's Notions
Élan Patterns & Supplies
Fabric.Com
| 