|
PatternMaker Sewing projects
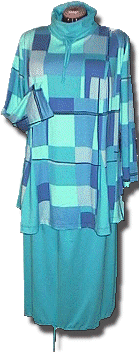
Two Tunics
Use knit, jersey or other stretchy fabric.
Sew the seams with serger or with medium long narrow, zigzag stitches.
Trim and overlock seam allowances if using zigzag. Sew hem and sleeve
cuffs with double needle and trim seam allowances from the wrong side
of the garment.
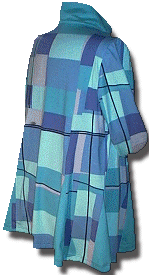
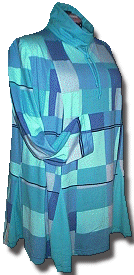
Tunic with flared hem and chimney collar
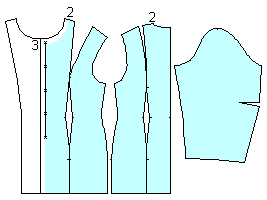
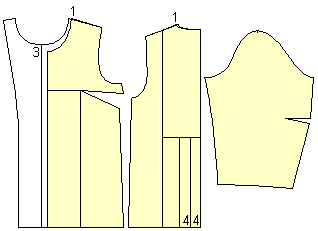
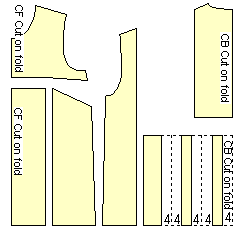
Preparing the patterns
Use the blouse macro in PatternMaker ladies' vol. 1 macro collection.
Cut away button extension and front facing. Increase width of neck opening
with 2 cm (3/4") and lower neck opening at the front with 3 cm (1
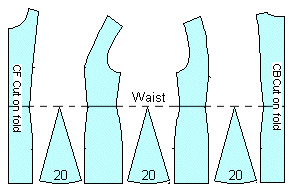
1/4"). Draft 6 hem flare pieces according to the drawing from waist
to hem, width at the hem 20 cm (7 3/4").
Draft pattern for collar according to drawing, height 40 cm (15 3/4"),
width same as the circumference of the neck opening of the garment. Remember
to add seam allowances.

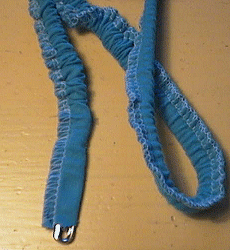
Sewing the collar
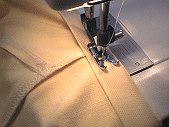
Iron interfacing to collar piece as in the photo and sew button holes
for draw string.
Sew the vertical seam of the collar (raw edges in the picture) right
side against right side. Iron seam. Turn collar right side out and fold
into finished height. (The height of the collar piece is 40 cm (15 3/4")
and finished height 20 cm). Sew a 3 cm (1 1/4") wide casing
for the draw string at the top edge of the collar. machine baste along
the bottom edge.
Sewing the draw strings
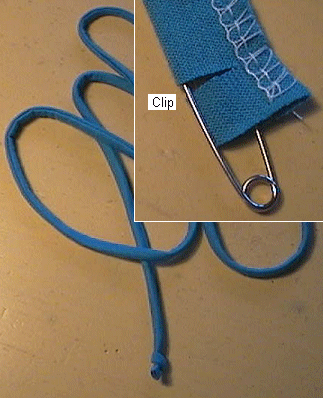
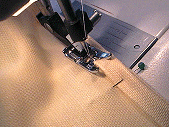
Cut a 5 cm (2") wide fabric strip. Fold it lengthwise into two right
side inside and sew the long edge. Trim seam allowance if needed. Clip
one end of the draw string as in the picture and slip safety pin trough
the clipping. Turn the draw string right side out using the pin. Slip
the draw string into the casing.
Sewing the tunic
Hint: Use multicolored fabric to the shell and monochrome fabric or
fabric of contrating color to the collar, the flare pieces and the skirt
as in the sample garments.
Sew one hem flare piece to both edges of the center front piece
from waist to hem. Sew front side pieces to front center piece. Sew hem
flare pieces to the sides of the front side pieces. Sew one hem flare
piece to both edges of the center back piece from waist to hem. Sew back
side pieces to back center piece.
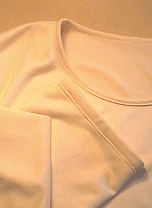
Sew side and shoulder seams. Sew collar into neck opening. Sew the sleeve
seams and hem the sleeve cuffs. Attach sleeves into armscyes. Hem the
tunic.
Sew a matching skirt
If you want to sew a matching long skirt with draw string at the hem,
cut one straight piece for it, width according to your hip circumference
+ 10 cm (4") ease and length according to the desired skirt length.
Add 2 x 4 cm (2 x 1.5") + seam allowance to the top edge of the skirt
for waist elastic and 2 x 3 cm (2 x 1") + seam allowance to the bottom
edge of the skirt for a casing for draw string. Another alternative
is to use the skirt macro in the ladies' vol. 1 macro collection.
There is an option for elastic waist.
Iron interfacing to the wrong side of the skirt hem CF where you intend
to sew the button holes for the draw string. Replace at least half of
the draw string with elastic to make sure that the hem stretches
enough when you walk.
Tunic with pleats at back hem
Preparing the patterns
Use the shirt macro in the ladies' vol. 1 macros.
Cut away button extension and front facing. Increase the width of the
neck opening with 1cm (1/2") and lower neck opening at the front
with 3 cm (2 1/4") or as much as you want to.
Cut the patterns and draft the pattern for the pleated back hem piece
according to the drawing.
Sewing the tunic
Topstitch all the seams except of the side, shoulder and sleeve
seams with double needle immediately you have sewn (and ironed) the seam.
Iron again after topstitching. Sew the hem and sleeve cuffs with
double needle and trim excess fabric from the wrong side.
Sew the lower front pieces together right side against right side.
Sew the horizontal seam of the front piece right against right. Sew side
seams. Hem this part of the tunic.
Hem the back pleat piece. Fold, iron and edgestitch the pleats.
Machine baste at the top edge. Attach the pleat piece to the CB top piece
right side against right side.
Sew the vertical back seam. Sew shoulder seams. Sew sleeve
seams.Attach sleeves to the shell.
Read instructions in the  general
sewing instructions of how to sew a neat bound edge to the
neck opening and sleeve cuffs. general
sewing instructions of how to sew a neat bound edge to the
neck opening and sleeve cuffs.
| 