|
PatternMaker Macros and Pattern Collections
PatternMaker uses small add-on programs called macros to
produce fashion patterns according to given measurements.
You need PatternMaker
to run these macros. Macros can be run with PatternMaker Basic,
which is freeware and which you can get directly from PatternMaker.To download and buy macros, please go to the
 PatternMaker Website. PatternMaker Website.
Ladies' vol. 1 macros are included in all commercial
versions of the program. Other macros you can buy separately.
Macro collections published so far
To see what macro collections there are , please go to the
 PatternMaker Website. PatternMaker Website.
Installation password
You get a password when buying macro collection. If
you don't have it ask for it by email from where you bought the macros. Please contact pmaker@eskimo.com if you need help.
Two
free macros
You can get two fully-functional macros for free when you go to the PatternMaker website. The download includes
Ladies' Pants and collars macros as fully-functional versions
and other garment collections as demo versions. Please note that in
the demo macros you cannot type your measurements.
If you are going to use the
Freeware Basic version of PatternMaker with which you can run
all the macros, you can
buy additional macro collections.
Free macro for button lines and folding dart
Download free macro for applying a button line in the patterns. When
you run the macro it asks the number of buttons and the length of the
button line. Then the macro applies the button line starting from the
place where you click. If you want to apply a button line between two
points on the pattern (e.g. between bust and high hip (abdomen, this
is a good choice for jackets regardless of the jacket length), first
measure the distance of these points with PatternMaker measuring tool
(Draw/Dim). Give this length to the macro.
Download button line macro: PatternMaker Website. After you have clicked the link from within the PatternMaker site, your browser asks whether
you want to run the file from where it is or save it to your (hard)disk.
Choose running the file. Then a WinZip window opens and you can extract
the file into the directory where you want it to be. Use the macro in
PatternMaker the way you use other macros. PatternMaker Website. After you have clicked the link from within the PatternMaker site, your browser asks whether
you want to run the file from where it is or save it to your (hard)disk.
Choose running the file. Then a WinZip window opens and you can extract
the file into the directory where you want it to be. Use the macro in
PatternMaker the way you use other macros.
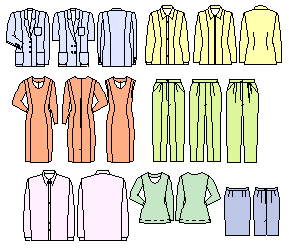
 Ladies'
vol. 1 macros include: Ladies'
vol. 1 macros include:
Ladies' vol. 1 macros are included in all commercial versions of PatternMaker:
Jacket
Blouse
Dress
Pants
Shirt
Bodyshirt (pullover)
Skirt
Other macro collections can be bought separately from PatternMaker at the
 PatternMaker Website. PatternMaker Website.
One macro with many garment options or many macros
In macro collections where there only is one macro file,
the garments alternatives are as selectable options. In other macros
the garment alternatives are as different macro files.
About ease in the macros
Patterns cannot be drawn exactly according to one's body
measurements because one could not move in the finished garment.
Also fashion determines how much ease there is in certain garments.
Jackets, dresses and blouses, for example, are rather tight-fitting
and body hugging nowadays. A few years ago, jackets used to be
boxy and straight.
The amount of ease calculated for PatternMaker patterns
is moderate, according to prevailing fashion.
Ease for basic patterns (Basic bodice and Pants) is predetermined
and cannot be changed. They are close-fitting garments with only
the needed fitting ease added.
If you want to add or decrease ease to these garments,
cut body or pants pieces vertically in two and move parts apart
from each other or on top of each other to get the desired result. There
is an exercises of how to do this in  Exercise 9
in the Tutorial, also available on this website. Don't add or decrease
anything to side, armscye or sleeve seams. This is also the technique
to be used, if you want to add ease to a jacket to change it to an overcoat.
Start from maximum ease version jacket. Pants and skirt can be enlarged
also by adding space to (only) side seams.
The basic bodice is to be used as a basis for your own
designs and you have to add the needed ease for fitting and style yourself.
Basic bodice is not to be used as is for any garment. It
will fit like "a second skin."
The ladies' shirt also has a predetermined ease which
cannot be changed. It is a garment similar to a men's dress shirt
with dropped sleeve caps. If you want to sew a more fitted shirt,
use blouse macro and leave darts unsewn.
Other garment patterns have three ease choices: Minimum,
Normal and Maximum
You should always make your first garment with normal
ease. This is good for most cases. It contains enough wearing
ease as well as the ease needed for garment design. Don't add
anything to your body measurements - the program calculates the needed
eases. Garment patterns drawn with PatternMaker macros are ready
to be sewn as they are.
Here are some ideas of how to use other than normal
ease
Minimum ease:
garments of very thin fabrics
close-fitting garments and evening dresses
garments made of elastic fabrics
closely fitting sleeveless dresses
underwear
Maximum ease:
garments of thick fabrics
jackets of thick wool fabrics for outdoors use
garments for leisure use
loose-fitting garments like (tunics, T-shirts, sweaters etc.) outer
garments to be worn over other garments
You might want your garments to have more ease or less
ease than normally used. Once you are familiar with the patterns
the macros create, you can use maximum or minimum according to your
wishes. By testing different eases, you will learn to use them
for many purposes.
You should not change your actual body measurements in
order to increase or decrease ease. It won't work. You don't
know all the measurements which have to be changed or cannot change
them as the program calculates some measurements for you.
Ease chart
In the following table you'll find the ease applied to
women's basic macros.
Ease is normally described by giving it at bust circumference.
There is also ease at other places such as at neck circumference, back
width, armscye depth, shoulder and sleeve length etc. These eases
are not given in the table below but the differences correspond to bust
ease.
Basic bodice: Bust +3.25.00in/8 cm
Skirt: Normal hip +1.5in/+4cm, Minimum hip +0.75in/+2 cm, Maximum hip
+2.5in/+6
Pants: Waist +0 cm , Abdomen and hip +1.5in/4 cm
Pullover: Minimum, bust -0.75in/2 cm, Normal, bust +0in/0 cm, Maximum,
bust +3.25.00in/8 cm
Blouse: Minimum, bust +4in/10 cm, Normal, bust +4.75in/12 cm, Maximum,
bust +5.5in/14 cm
Shirt: Bust +6.25.00in/16 cm
Jacket: Minimum, bust +4.75in/12 cm, Normal, bust +5.5in/14 cm, Maximum,
bust +6.25.00in/16 cm
Dress: Minimum, bust +4in/10 cm, Normal, bust +7.75in/12 cm, Maximum,
bust +5.5in/14 cm
Shoulder pads
Space for shoulder pads is included in most of the patterns.
Pullover is designed without shoulder pads.
HINT : If you want to add shoulder pads to garments which
do not have space for them, raise shoulder tip at front and back
0.5-1 cm / 1/4-1/2" and lengthen shoulder with same amount.
Also raise the top of the sleeve cap with same amount you raised
the shoulder tip.
Length of the garments in the ladies' vol. 1 macro collection
The length of the garments is measured from the waistline. In the jacket
macro you can type any length in the measurement dialog box, 0 cm means
a length to the waistline. In the blouse macro you can use a length
to the abdomen line or more in the dress macro to the hip line or more.
If you need a shorter garment, cut the pieces accordingly. The length
of the shirt is always hip height + 10 cm (4"), the length of the
pullover is always abdomen height +5 cm (2"). The length of the
basic (bodice) block is to the hip line. If you need a shorter or a
longer garment, cut the pattern pieces or move the hem vertices accordingly.
| ![]() Site
Map
Site
Map


 Ladies'
vol. 1 macros include: