To downlaod and buy macros, please go to the
PatternMaker Website.
Following the instructions in this sewing project you
sew bra without underwire. This kind of a bra can be nearly as
tight-fitting as a bra with underwire, but it is much easier to sew.
Furthermore, you do not need to get the underwires which might be difficult.
Patterns
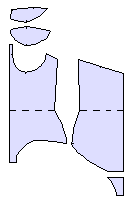
The patterns for a bra without underwire can be drafted
with the measurements of the basic sloper and a couple of additional
measurements which are easy to take. For bra with underwire much more
measurements are needed and they are not always very easy to take.
 If
you have PatternMaker Home or one of the other CAD versions of the program,
you can use the patterns just like you would use any other PatternMaker
patterns. You can alter them, join them to other PatternMaker patterns
etc. You could - for example - join the bra patterns to the patterns
of panties to get patterns for a bodysuit (more about this below).
If
you have PatternMaker Home or one of the other CAD versions of the program,
you can use the patterns just like you would use any other PatternMaker
patterns. You can alter them, join them to other PatternMaker patterns
etc. You could - for example - join the bra patterns to the patterns
of panties to get patterns for a bodysuit (more about this below).
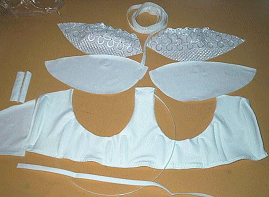
You get the cups in two versions, horizontal and vertical
cut. You can later on make new cup designs using these basic patterns.
To read more about the cup designs, please refer to the
 sewing
instructions page for lingerie on this site.
sewing
instructions page for lingerie on this site.
Notions
As closures you can in stead of the hook-and-eye
tape use zipper, buttons, Velcro or plastic closures sold for swimwear
bikini tops. The closures can be applied to the back or to the front
of the bra according to your wishes.
 As
fabric you can use normal lingerie tricot or jersey. I suggest you
use elastic fabric. Part of the cup can be sewn of stretchy lace or
lace fabric. You can apply decorations, such as a bow, flower or lace
appliqués. For ideas refer to the sewing
projects for camisole and panties on this site. To get a firm band,
the midriff part should always be sewn of double fabric.
As
fabric you can use normal lingerie tricot or jersey. I suggest you
use elastic fabric. Part of the cup can be sewn of stretchy lace or
lace fabric. You can apply decorations, such as a bow, flower or lace
appliqués. For ideas refer to the sewing
projects for camisole and panties on this site. To get a firm band,
the midriff part should always be sewn of double fabric.
Note! To be able to sew a test garment, always
buy extra fabric. The notions can be detached from the test garment
and used for the final garment.
Furthermore you need lingerie edge elastic. When
you buy it, check that it restores the original length after stretching
it. There are a lot of bad quality elastic available. Consider an alternative
to use elastic of contrasting color, that might be the only decoration
needed for your bra. You can also use normal narrow elastic and sew
it under the edge of the garment. If you use lace or lace fabric for
some parts of the bra, it usually is advisable to strengthen its edge
with transparent elastic (Framilon). Read more about edge elastics and
the techniques to attaching them in the
sewing
instructions for lingerie on this site.
If you want to sew padded bra choose the horizontal
cutting option for the cup and sew the bottom half of the cup of double
fabric. You can the bottom of the cup or the entire cup and you can
add padding between the lining and the bra, if you want to. The simpliest
way of making padded bra is to cut the cups from padded fabric.
Ready made band is sold for shoulder straps. You
can also make the shoulder straps yourself. For ideas and sewing techniques,
please refer to the sewing
instructions for lingerie on this site.
Hint: Using two spaghetti shoulder straps for
both sides of the bra may look nice. To get instructions of how to sew
spaghetti shoulder straps, please refer to the sewing
project for camisole and the sewing
instructions for lingerie on this site. You can also sew a fabric
tube and insert elastic into it. Stretch the elastic inside the tube
and topstitch the tube with 3 stitch or narrow, medium long zigzag e.g.
from the distance of the presser foot from both edges.
Always sew a test garment
 Sewing bra is much easier than you ever have thought. Nevertheless,
always sew a test garment first. It is necessary to check the fitting
of the patterns and the scaling factors used to reduce the patterns
in size. If you are not used to sew lingerie, sewing a test garment
also lets you exercise the sewing techniques.
Sewing bra is much easier than you ever have thought. Nevertheless,
always sew a test garment first. It is necessary to check the fitting
of the patterns and the scaling factors used to reduce the patterns
in size. If you are not used to sew lingerie, sewing a test garment
also lets you exercise the sewing techniques.
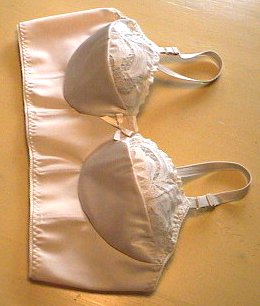
If the test garment does not fit well, check which pattern
pieces have to be changed and how much. Be critical. The aim is to get
Very Good Bra Patterns for you to be used in many sewing projects. In
the picture to the left you see a test garment. Even if the bra feels
all right when worn by the subject and could be used as such, the fitting
is not optimal and the patterns need to be changed accordingly.
After having got good bra patterns for your figure you
will be able to sew luxurious bra with perfect fit in a couple of hours.
After you have learned the sewing techniques it may be worth while investing
in more expensive fabrics and laces. And once you have used bra sewn
to your own measurements, you never again want to wear anything else.
This is especially true with women who have a prominent bust and who
need extra support for it but find it difficult to get well-fitting
ready made bra.
Cutting
If you choose the horizontal cut option for the cups,
cut the bottom pieces so that the direction of stretch of the
fabric is horizontal. Cut the top piece of the cup so that the
direction of stretch of the fabric is vertical. The top pieces of the
cups can also be cut from lace or lace fabric. If you make the entire
cup of lace, consider lining it with elastic gauze sold for this purpose
(e.g. under trade mark Spandex).
Cut the midriff pieces in two copies of elastic fabric.
Sewing
Sew the seams with narrow (1-1.5 mm), medium long (2-3 mm) zigzag or
serger. Trim seam allowances near stitches if necessary. Use 3 stitch
zigzag or narrow (1-1,5 mm), medium long (2-3 mm) zigzag to topstitch.
Always machine baste the seams first. After you see that the
seam is all right you can finish it with zigzag. It is almost impossible
to unravel zigzag neatly. You do not need to unravel the machine basting
stitches, they will break when you use the garment and wear away.
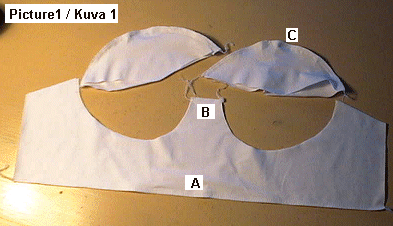
 Sew
the midriff pieces together at bottom edge (picture 1A) and at
front center top edge (picture 1B), right side against right
side. Turn the piece right side out and topstitch with 3-stitch zigzag
along these edges.
Sew
the midriff pieces together at bottom edge (picture 1A) and at
front center top edge (picture 1B), right side against right
side. Turn the piece right side out and topstitch with 3-stitch zigzag
along these edges.
Sew dividing seam of cups (picture 1C) and topstitch.
Be careful not to stretch the seams when topstitching. Loosen the pressure
of the presser foot a bit if necessary.
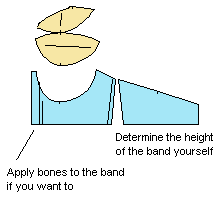
If you apply bones to the bra band, sew casings
for them to the midriff piece according to markings on the patterns
- or to places where you want to have them. You can draw guiding lines
to the wrong side of the bra band with pencil (picture 2A). The
marks will vanish when the bra is washed for the first time.
You can buy webbed plastic with caps called Rigilene
for the boning purpose (picture 2B).
 The
boning must end 1/2" to 3/4" from each end of the finished
seams. (picture 2C). Topstitch Rigilene with 3 stitch zigzag
on the right side of the garment. Bartack at both ends to make sure
that the band does not move in the casing when the garment is worn.
The ends of Rigilene tape are very sharp and can break the fabric. Caps
are therefore recommended.
The
boning must end 1/2" to 3/4" from each end of the finished
seams. (picture 2C). Topstitch Rigilene with 3 stitch zigzag
on the right side of the garment. Bartack at both ends to make sure
that the band does not move in the casing when the garment is worn.
The ends of Rigilene tape are very sharp and can break the fabric. Caps
are therefore recommended.
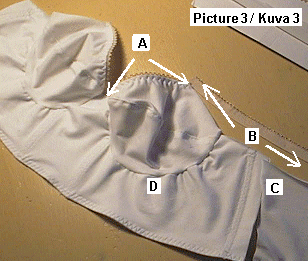
Finish top edges of cups with edge elastics from the CF end of the
cup dividing seam (if horizontal cutting) or from the mark in the pattern
(if vertical cutting) to the place where shoulder straps are fastened
(marked in the patterns) (picture 3A). For applying edge elastic
please refer to the sewing
instructions for lingerie on this site.
Fasten cups to midriff piece (picture 3B), matching notches
on cup seams to midriff piece. Stretch midriff piece when sewing. If
you want the seam to be very neat you can cover it with bias tape. If
you want to do that, sew the unfolded bias tape into the seam matching
raw edges, trim seam allowance, fold bias tape on top of the seam and
edgestitch along other edge (folded). Sew very carefully, the stitch
line must stay at same distance from and parallel to the cup seam (picture
to the right).
Finish bottom edges of back panels with edge elastics. Sew back panels
to cup/midriff part (picture 3C) and finish seam allowances with
bias tape if you want to.
Finally, finish the top edges of the back panels (leaving the shoulder
straps between the elastic and the back panel) and the cups top edges
not yet finished with edge elastic (picture 3D). Leave excess
elastic at the cup corners.
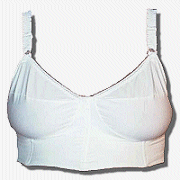
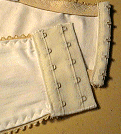
Fasten hook-and-eye tape or other kind of closures to the ends
of the back panels (picture 4). Put the bra on and check the
correct length of the shoulder straps by pinning them to their places
at the top edges of the cups. Fasten shoulder straps to the cups with
two horizontal stitch lines. Fold the excess elastic you left at the
cup corners under the shoulder straps.
Hint: When you are sewing a test garment, sew the hook-and-eye
tape and the shoulder straps lightly to their places with normal sewing
machine stitches and use the bra for a couple of days. After you have
noticed that the bra feels comfortable, strengthen the fastening with
zigzag. If you find it necessary to change the length or the place of
the shoulder straps or the length of the bra band, you can still do
it easily. Hook-and-eye tape and ready made shoulder straps also are
too expensive to be thrown away with a useless test garment.
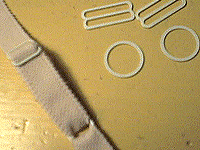
Hint: Shoulder straps may stretch in use and therefore I
recommend that you apply adjusting mechanism to the shoulder straps
(picture 5). Look at your old bra to see how the mechanism is
applied to the shoulder strap. The easiest way to fasten the rings to
the cups is to fold the extra elastic left at the bra top edge to the
wrong side and put the ring in between. Fasten the elastic to the cup
with two horizontal stitch lines.
 Other
ideas to use bra patterns
Other
ideas to use bra patterns
Lengthen the bra band to waist and join the patterns to
the patterns of panties. You'll get patterns for a bodysuit.
If you do not have the pant patterns you can use the miniature patterns
included in the panties'
sewing project on this site or order them from me. Make a hook-and-eye
fastening construction at the crotch of the pants - that way you do
not need to undress the entire bodysuit when you pop in the ladies'
room.
Sew a waist length bra of e.g. denim and use it under a jacket as a
summer top. Or sew it of festive fabric and use it with a long or a
short evening skirt, maybe with a bolero.
Lingerie fabrics and notions from the Internet
If you have difficulties in getting fabrics and notions for lingerie,
please refer to the following websites
Spandex House
SewSassy
Full & Sassy Pattern Boutique
Clotilde
Nancy's Notions
Élan Patterns & Supplies
Fabric.Com
|
 Home page
|
Home page
|
 Suomeksi
|
About Leena's
|
Contact
Suomeksi
|
About Leena's
|
Contact
Leenas.com is a subsidiary of PatternMaker Software USA. Copyright © 1998, 2006 Leena Lähteenmäki, PatternMaker Software.
http://www.patternmaker.com
|
