Copyright ©1998-2000 Leena Lähteenmäki,
Järvenpää
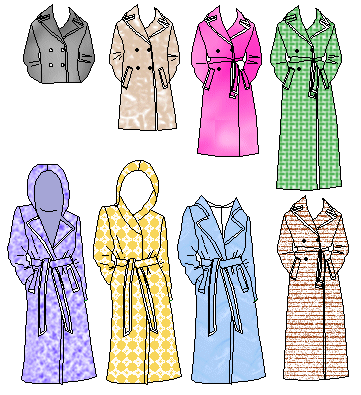
Use PatternMaker ladies' coat/robe macro to draft patterns to this coat.
To download and buy macros, please go to the PatternMaker Website.
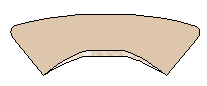
In the macro there are options for two kinds of hoods, normal and integrated.  See
picture.
See
picture.
 Iron
interfacing to coat's front and back facings, under collar and
pocket flaps. It is also good to iron interfacing to coat's hem seam
allowance. When cutting the collar pieces, cut upper collar about
1/4 inch (1/2 cm) bigger at the neck edge. This forces the collar
to turn down to its correct position when it is done.
Iron
interfacing to coat's front and back facings, under collar and
pocket flaps. It is also good to iron interfacing to coat's hem seam
allowance. When cutting the collar pieces, cut upper collar about
1/4 inch (1/2 cm) bigger at the neck edge. This forces the collar
to turn down to its correct position when it is done.
Only vertical coat seams need to be overlocked.
Collar, shoulder and sleeve seams do not need to be overlocked as they
will be inside the lining. Press all seams after sewing and overlocking
them.

Cut a seam at the linings CB and add extra width to
the seam, to form a pleat.
Sew pocket flaps together along the outer edge right side to
right side. (Picture 1A). Clip seam allowances at corners. Turn
flaps right side out and iron. Edgestitch at a distance of 3/4"
(1.5 cm) from the edges.
Sew pockets to the front pieces. Mark the pocket mouth line
on the front pattern pieces by machine basting. Place pocket flap on
the line raw edges towards side seam. Place one pocket bag on top of
the flap and the other opposite it on the pocket mouth line. (Picture
1B).
Sew a rectangle around the pocket mouth line, sewing through all thicknesses.
(Picture 1C). Cut along the line and diagonally at the ends at
the corners. Push pocket bags to the wrong side of the garment and press.
Turn pocket flap to its right position and press. Attach the flap ends
to the garment along the edgestitching, sewing through all thicknesses.
If you need more instructions of how to sew pockets, refer to the
general sewing instructions on this site.
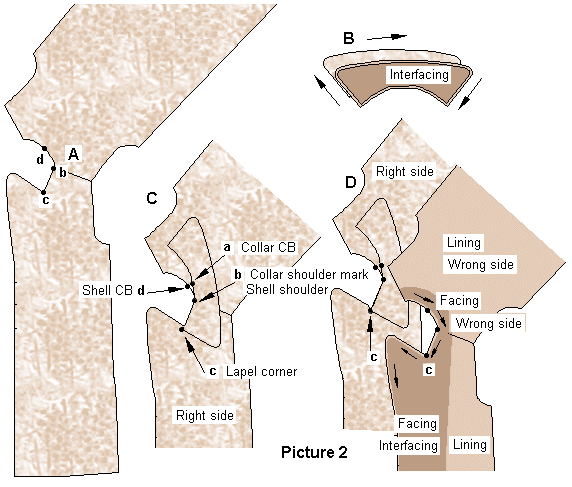
Sew the coat's shoulder and side seams. (Picture 2A).
Prepare collar. Sew under collar and top collar together right
side to right side. Clip at corners and turn right side out and iron.
(Picture 2B). Machine baste the raw edges of the collar (neck
seam) together.
Place collar on the coat's neckline, with right side of under
collar against the coat's right side. Match collar shoulder mark
with the coat's shoulder seam. Machine baste the collar to the coat's
neck from lapel corner (Picture 2C, point c) to other
lapel corner. Clip the seam allowance at the lapel corners.
Prepare sleeves. Sew sleeve elbow darts and sleeve seams. Sew
sleeves to the armscyes. Easestitch sleeve cap, allowing a seam allowance
of 1/4 inch (1/2 cm). Turn sleeves right side out and coat wrong side
out. Place sleeves inside coat (right side against right side)
so that sleeves' shoulder marks match with the coat's shoulder seams.
Insert sleeves by sewing along easestiches Adjust ease by pulling
on the stitching in the ease cap. If there tends to be too much ease
at sleeve cap (some fabrics tolerate more ease than others do), you
can adjust this by placing sleeves lower at the armpit. There
should be as much ease as possible, but no wrinkles at cap seams, when
done.
HINT: In the design tutorial there are instructions of how to use
a facing in sleeve cap to helps to get nicely formed sleeve heads.
Click here
.
Prepare lining. Sew the side and the back seams of the lining.
Fold the lining's hem seam allowance twice in and sew. Sew front facings
to the lining front edges and back neck facing on top of the right side
of the lining's back neck. Sew lining's shoulder seams. Sew lining's
sleeves and sew the sleeves to the lining.
To join the jacket and the lining, place the lining on top of
the coat with right side against right side. Leave collar
in between and upside down. (Picture 2D). Sew a continuous
seam as follows: across hem of front facing, along one front edge,
around neck to other front edge and finally across hem of other front
facing. Clip seam allowance at at neck seam at about 1 inch (2
cm) intervals. Cut corners diagonally (including the corner atthe
front of hem) and turn the lining inside the jacket. Open seams
well and press. Edgestitch along the front edges and around the
collar at a distance of 3/4" (1.5 cm) from the edges.
If you sew a hood to your coat, attach it to the the coat the
same way you attach the collar. You can sew the coat with hood with
or without collar. The latter one is sewn the same way a shawl collar
is sewn.
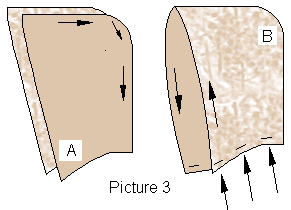 If
you choose to sew a normal or a detachable hood, cut the hood
pieces in 4 copies. If you use different fabric to the hood lining,
cut 2 hood pieces from the coat fabric and 2 from lining fabric. Sew
the back seam of the hood, hood pieces right side aganst right side
(Picture 3A). Sew the back seam of the lining the same way. Place
the lining inside the hood, right side against right side and sew along
front edge (Picture 3B). Turn hood right side out, open seams,
press and edgestitch at a distance of 3/4" (1.5 cm) from the edge.
Baste the neck edges of the hood together. Attach the hood to the coat
the same way you attach the collar. You can sew both the collar and
the hood to your coat.
If
you choose to sew a normal or a detachable hood, cut the hood
pieces in 4 copies. If you use different fabric to the hood lining,
cut 2 hood pieces from the coat fabric and 2 from lining fabric. Sew
the back seam of the hood, hood pieces right side aganst right side
(Picture 3A). Sew the back seam of the lining the same way. Place
the lining inside the hood, right side against right side and sew along
front edge (Picture 3B). Turn hood right side out, open seams,
press and edgestitch at a distance of 3/4" (1.5 cm) from the edge.
Baste the neck edges of the hood together. Attach the hood to the coat
the same way you attach the collar. You can sew both the collar and
the hood to your coat.
If you want to sew a detachable hood, sew its neck seam from
the wrong side - before turning the hood right side out. Leave an opening
for turning the hood right side out. Close the opening with hand stitches.
Then press and edgestitch. Sew buttonholes to the neck edge of the hood
and buttons to the coat neck (Picture 3B). Or use snaps. If you
use zipper as the fastener, sew one half of it to the coat neck seam
under the collar and the other half to the hood neck seam.
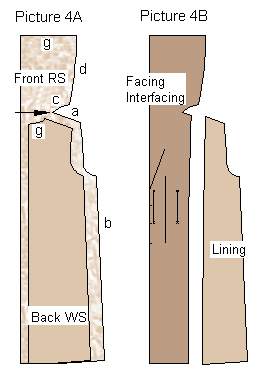 If
you choose the integrated hood, sew the coat's shoulder (Picture
4A, a) and side seams (Picture 4A, b) and the back seam of
the hood (Picture 4A, d-g). Cut the seam allowance at the shoulder/neck
corner of the coat (Picture 4A, arrow) and sew the hood neck
(Picture 4A, c) to the coat neck (Picture 4A, g). Cut
clips to the seam allowances with intervals of about 1" (2 cm).
If
you choose the integrated hood, sew the coat's shoulder (Picture
4A, a) and side seams (Picture 4A, b) and the back seam of
the hood (Picture 4A, d-g). Cut the seam allowance at the shoulder/neck
corner of the coat (Picture 4A, arrow) and sew the hood neck
(Picture 4A, c) to the coat neck (Picture 4A, g). Cut
clips to the seam allowances with intervals of about 1" (2 cm).
Prepare the lining as for coat with collar and attach the front
facing with the integrated hood to the front edges of the lining (Picture
4B ). Sew shoulder seam. Cut seam allowance at the shoulder/neck
corner. Sew the back seam of the hood and sew the hood neck to the coat
neck in the lining as in the coat. Cut clips to the seam allowances.
Press coat and lining. Put them right side agains right side and sew
accross the hem of one facing and around front and hood edges and accross
the hem of the other front facing. Turn the coat right side out, open
seams and press. Edgestitch front edge at a distance of 3/4" (1.5
cm) from the edge.
Fold sleeve cuff seam allowances in and sew with invisible stitches.
Attach the lining to the sleeve ends. Sew hem with invisible
stitches. Sew buttons and buttonholes.
 Sew
belt loops and attach them on side seams according to the marks
in the patterns. Sew belt. Cut belt double from coat fabric on
fold and single from quilted lining fabric. Fold the belt lengthwise
into two, right side in, place lining on top of it and sew accross the
ends and along the long side. Leave an opening for turning the belt
right side out. Turn the belt right side out and close the opening with
hand stitches. Edgestitch at a distance of 3/4" (1.5 cm) from the
edges.
Sew
belt loops and attach them on side seams according to the marks
in the patterns. Sew belt. Cut belt double from coat fabric on
fold and single from quilted lining fabric. Fold the belt lengthwise
into two, right side in, place lining on top of it and sew accross the
ends and along the long side. Leave an opening for turning the belt
right side out. Turn the belt right side out and close the opening with
hand stitches. Edgestitch at a distance of 3/4" (1.5 cm) from the
edges.
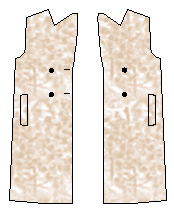
Sew button holes in front edge of one front piece according to marks
in the patterns, only 2 button holes (look at the drawing). Sew buttons
on top of other 2 button holes in this same front piece. Sew 2 button
holes to the other front piece, only 2 buttons.
Do the final pressing.
