|
Sewing Instructions For Women's Garments
Copyright ©1998-2000 Leena Lähteenmäki,
Järvenpää
SEWING SKIRT
Cut waist band on fold.
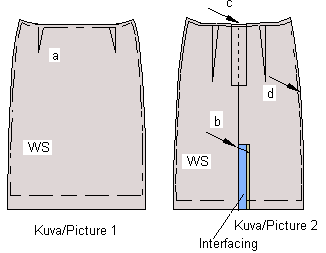
Sew front and back darts (Picture 1a).Iron them towards center front
and back. Sew center back seam between the zipper and the back slit. Baste
seams of zipper and back placket. Sew back slit according to  general sewing instructions
(Picture 2b) attach zipper according to
  general sewing instructions
(Picture 2c). Sew and overlock side seams (Picture 2d).
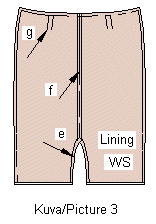
Fold seam allowances of the slit of the lining inwards and edgestitch
(Picture 3e).
Overlock back seam. Baste back seam from top to where the end of the
zipper will be, and sew from there to slit hole (Picture3f). Press back
seam open and remove zipper-basting stitches. Edgestitch zipper
slit.
Fold waist darts of the lining to form soft pleats and pin (Picture
3g). Sew and overlock side seams of the lining. Fold seam
allowance for hem inside twice and sew. Make sure that the lining
will be about an inch (a couple of centimeters) shorter than the skirt
when both are done.
Place lining inside skirt and pin at waist, wrong side against wrong
side and side seams matching. Easestitch waist with normal seam
allowance, using your machine's longest stitches to attach lining to skirt.
Tighten or loosen waist easestitching so that waistband fits to skirt
waist. The result should have no gathers or wrinkles. Attach waist
band according to  general sewing instructions .
Fold skirt hem allowance and blindstitch with machine or by hand. Sew
buttonhole and attach button.
SEWING PANTS
Cut waist band on fold.
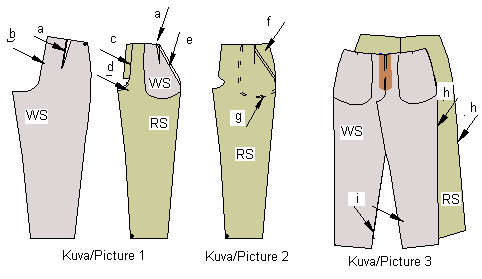
Sew front and back darts (Picture 1a). If you are sewing a pleated
version, fold front pleats soft and pin or baste them at top. Sew
and overlock back center seam with elastic stitching, if possible (Picture
1b). Overlock front center seam and edges of zipper placket (Picture
1a) Sew front center seam from inside seam to where zipper placket begins
(Picture 1d). attach zipper according to  general sewing instructions
.
Cut front piece pocket corner off, don't forget to add seam allowance.
Put a reinforcing strip of non-elastic fabric (not included in pattern)
into the seam to prevent pocket mouth from stretching during use.
Place under pocket (lining) along slacks front piece's pocket line, right
sides together, and sew. Turn under pocket (lining) inside and edgestitch
pocket mouth (Picture 1e). Sew another row of stitches at presser
foot's width from the first row of stitches.
Place pocket corner pieces under pocket lining with round edges matching
(Picture 2f ). Sew and overlock them together, leaving pocket mouth
open (Picture 2g ).
Place front and back sections of slacks on top of each other, right
sides together. Sew and overlock side seams (Picture 3h ).
Sew and overlock leg seams from cuff to cuff (Picture 3i).
attach waistband according to  general sewing instructions
. Fold cuff seam allowances inwards and blindstitch with machine
or by hand.
If you want to put a lining in the slacks, cut lining pieces using the
slacks patterns and sew them without pockets. attach lining to slacks
at waistband seam when attaching waistband. Handsew lining at edges
of zipper placket. You can also line only the front pieces of slacks.
Or sew facing to front pieces only at knee for a distance of about 10
cm up and down from knee. attach lining to seams when sewing the seams.
SEWING PULLOVER
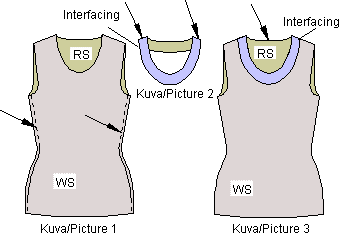
Sew and overlock shoulder and side seams (Picture 1).
Iron interfacing to front and back neck facings. Sew and overlock shoulder
seams of neck facing (Picture 2). Place neck facing on pullover,
neck right sides together, and sew with normal seam allowance (Picture
3). Notch seam allowances at intervals of about 3/4 inch.
Turn facing inside pullover and press. Edgestitch from right side,
or sew only through garment and facing seam allowances near fold line.
attach facing to shoulder seams by hand with small stitches.
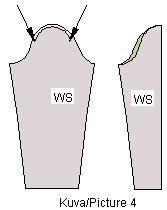
Easestitch sleeve caps along seam line. Sew and overlock
sleeve seams (Picture 4).
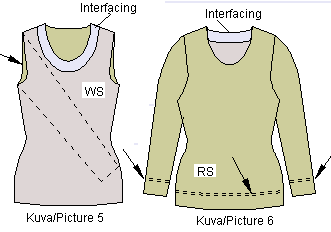
Turn sleeve right side out and pullover wrong side out. Place
sleeve inside pullover (right sides together) so that sleeve shoulder
mark matches with pullover shoulder seam and sleeve seam matches with
pullover side seam (Picture 5). Pull ends of ease stitching along
sleeve cap to adjust ease. Sew along ease stitching and overlock
sleeve to pullover. If there tends to be too much ease in sleeve
cap (some fabrics tolerate more ease than others do), place sleeve lower
at armpit. There should be no wrinkles at cap seams when done.
Fold hem and sleeve cuff allowances inside and sew with twin needle
on right side of pullover (Picture 6). Cut excess fabric from
inside near stitch line.
SEWING DRESS
Sew and overlock vertical seams at front and back pieces. Overlock
back center seam (use at least 3/4 inch or 2 cm seam allowance to leave
room to attach zipper). Sew back seam from neck to zipper, baste for length
of zipper, sew seam to back slit and baste along length of slit.
Sew slit according to  general sewing instructions
. attach invisible zipper according to
  general sewing instructions
.
Continue according to instructions for sewing blouse. Blindstitch
hem and sleeve ends, however, with machine or by hand.


 SEWING
BLOUSE SEWING
BLOUSE
Fold front edge's seam allowances (1 cm) inwards and baste (Picture
1). Fold again, but now with right side inside along button extension
fold line and stitch button extension across top and bottom edges (Picture
2).
If you are going to sew convertible collar to blouse, stitch top end
from fold only to center front, and cut seam allowance diagonally there.
Turn button extension to the wrong side of the blouse and sew along folded
edge of seam allowance on wrong side.
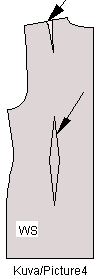
Sew and overlock front dividing seams (Picture 3). Sew back shoulder
and waist darts (Picture 4). Sew and overlock shoulder seams.
attach collar according to  general sewing instructions
. Sew convertible collar beginning from front center, and shirt
collar with band beginning from edge of button extension (fold).
Sew and overlock side seams.
Cut sleeve slits at sleeve ends. Overlock slit edges, turn inwards and
edgestitch. Continue to attach the sleeve cuffs according to  general sewing instructions
Easestitch sleeve cap at distance of normal seam allowance and continue
sewing and attaching the sleeves according to sewing instructions of pullover
above. Sew and attach sleeve cuffs according to  general sewing instructions
.
Fold hem allowance twice and sew. Sew buttonholes and buttons
on center front and sleeve cuffs.
SEWING SHIRT
(see picture for blouse) Sew according to sewing instructions for blouse.
Shirt, however, does not have front dividing seams or back darts.
SEWING JACKET
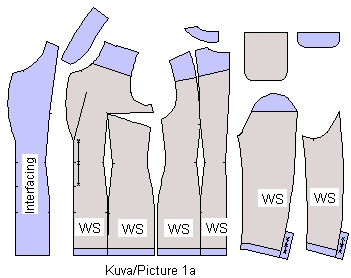
Iron fusible interfacing to under collar, front and back facings, sleeve
cap and button plackets, upper part of the front and back pieces, hem
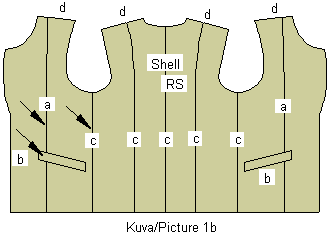
seam allowance and pocket flaps (Picture 1a).
 Cut
upper collar 0.5 cm larger at outer edge than under collar. This
will help collar to turn in to its proper position. Cut
upper collar 0.5 cm larger at outer edge than under collar. This
will help collar to turn in to its proper position.
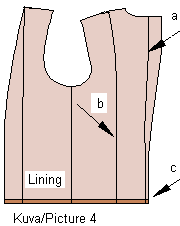
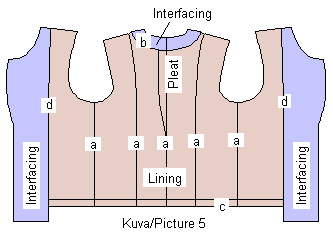
Use the pattern pieces as a guide in cutting lining pieces. Note that
as in the illustration (Picture 4a), you need to add a pleat extension
to the back lining. This extension is not given in the pattern.
Sew and overlock front princess seams (Picture 1b). Sew pockets to front
pieces according your styling preferences (see  general instructions
). Sew and overlock all other vertical seams of the shell (
Picture 1c ). Edgestitch if desired.
 Sew upper and under collar together at edges, right sides together,
(Picture 2a). Trim seams and cut seam allowance at corners.
Turn collar right side out and press. Edgestitch if desired.
Sew collar to jacket's neck collar with center back matching jacket back
center seam and collar edges matching notch marks at lapels (Picture 2b).
Easestitch sleeve cap at distance of normal seam allowance with the
longest stitch of your sewing machine (Picture 3a). Sew sleeve under seams
of the (Picture 3b). This is the seam that will go between arm and
body when the jacket is worn. Sew sleeve upper seams from
top to where button placket begins (Picture 3c), and from there around
placket at distance of normal seam allowance (Picture 3c).
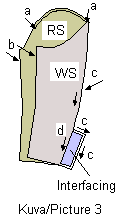 Baste
placket fold line (Picture 3d). Fold sleeve cuffs' seam allowance inside
and sew with invisible stitches. If you are sure that the length of the
sleeves is correct, sew buttons to sleeve button plackets through all
thicknesses of material. Baste
placket fold line (Picture 3d). Fold sleeve cuffs' seam allowance inside
and sew with invisible stitches. If you are sure that the length of the
sleeves is correct, sew buttons to sleeve button plackets through all
thicknesses of material.
Turn sleeve right side out and jacket wrong side out. Place sleeve
inside jacket (right side against right side) so that sleeve shoulder
mark matches with jacket shoulder seam and seam between the two sleeve
pieces matches with jacket side seam. Pull on easestitching in sleeve
cap to adjust cap ease. Sew and overlock sleeve cap to jacket.
If there tends to be too much ease in sleeve cap (some fabrics tolerate
more ease than others do), place sleeve lower at armpit. There should
be as much ease as possible but no wrinkles at cap seams when done.
To get instructions of how to use a facing at sleeve head to make a
perfectly shaped sleeve cap, please read  exercise 24 in the tutorial.
Cut extra width to upper part of lining's back (Picture 4a).
Sew and overlock all vertical seams of the lining right sides together
(Picture 5a). Zigzag back neck facing to the neck of back lining
with lining's wrong side against linings right side (Picture 5b).
Fold hem inside twice and sew (Picture 5c).
Attach jacket's front facing to lining's front edges, right sides together
(Picture 5d ) Overlock.
Sew and attach sleeves to lining as you did to jacket.
 To
join jacket and lining, place them on top of each other, right sides together.
Put collar between jacket and lining. To
join jacket and lining, place them on top of each other, right sides together.
Put collar between jacket and lining.
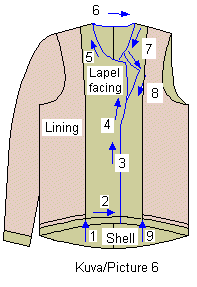
Start at point marked with number 1 and sew continuously as follows,
refer to Picture 6:
cross front facing hem (2),
along one front edge (3),
along lapel edges (4) and
front neckline edges (5),
along back neckline (6)
and then the same way along the other front edge (7-8) and
finally across other front facing hem. Stop at point marked with number
9.
Cut seam allowance at starting point of lapels and neck seam at intervals
of 3/4 inch (2 cm). Cut corners diagonally. Turn lining inside jacket.
Open seams and press well. Edgestitch if desired.
Sew buttonholes. Sew on buttons. Do final pressing.
| ![]() Site
Map
Site
Map


 SEWING
BLOUSE
  Cut
upper collar 0.5 cm larger at outer edge than under collar. This
will help collar to turn in to its proper position.
 Sew upper and under collar together at edges, right sides together,
(Picture 2a). Trim seams and cut seam allowance at corners.
Turn collar right side out and press. Edgestitch if desired.
Sew collar to jacket's neck collar with center back matching jacket back
center seam and collar edges matching notch marks at lapels (Picture 2b).
 Baste
placket fold line (Picture 3d). Fold sleeve cuffs' seam allowance inside
and sew with invisible stitches. If you are sure that the length of the
sleeves is correct, sew buttons to sleeve button plackets through all
thicknesses of material.
 To
join jacket and lining, place them on top of each other, right sides together.
Put collar between jacket and lining.