|
PatternMaker & PatternMaker Macros: Quick User Guide
User's
Manual | Applied tutorial | Grading
This Quick Guide tells you the basics
to get started with PatternMaker software and Macros. Try using the software
and macros with the help of this guide first. When you feel you need to
find out more, move on to
PatternMaker User's Guide.
This Quick Guide should contain all necessary information for using PatternMaker
Basic version with macros.
You will find answers to frequently
asked basic questions in this guide. If you have questions after reading
this guide, please do not hesitate to contact us.
Launching PatternMaker
 To
launch (open) PatternMaker, go to Start - Programs - PatternMaker. Click
the PatternMaker icon. To
launch (open) PatternMaker, go to Start - Programs - PatternMaker. Click
the PatternMaker icon.
Measurement Units
PatternMaker and the macros allow you to use either
centimetres or inches as measurement units. To set your personal preference,
go to
Settings - Units and choose your preferred option from the appearing
list. The program will remember your choice, so you don't have to do this
again unless you want to, for one reason or another.
Macros
Macros are mini programs, which are run (used)
inside PatternMaker. They help you make pre-drawn garment patterns to
any given measurements. Patterns are ready to be printed and made up as
they are, but it is also possible to alter the patterns using PatternMaker's
tools. (more on this below). To alter patterns you will need a Deluxe,
Home, Expert or Marker version of PatternMaker. - Patterns cannot be altered
in the Basic Version.
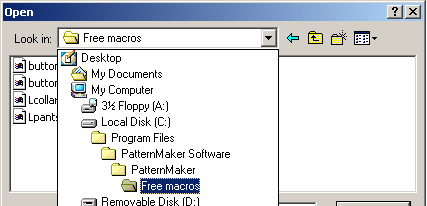
NOTE! Everyone gets two free macros, ladies'
trousers and ladies collars, included even with PatternMaker Basic. These
are called Lpants.mac ja Lcollar.mac. You will find them in the PatternMaker
folder, inside 'Free macros' folder. (See image below). Once you locate
this folder, PatternMaker will remember the location. The 'Demo macros'
folder contains the sample macros you will be able to try for thirty days.
Demo macro names are preceded by the letter 'D'. You may not enter your
own measurements into demo macros, but you may use them to see what kind
of patterns each macro produces. To read more about macros available please
cick here. You may purchase more macros
at any time.
When you purchase a macro collection, you will receive an installation
password. You can download and/or install
macro collections from this site using the installation password.
If you require more information on purchasing macros, please contact the
PM dealer from whom you have bought the macro collection.
Using Macros
 To
try out or use a macro: Go to
File-menu at the top of the screen, and select Macros from
the list, or click the Macro-icon. To
try out or use a macro: Go to
File-menu at the top of the screen, and select Macros from
the list, or click the Macro-icon.
First, a set of questions about the
style you want to make will be asked. A Window (box) opens, asking e.g.
the ease you would like for the garment.
Choose one of the given options by high-lighting it and clicking 'OK'.
The next question will appear. (Option: You may also double-click the
option to select it, instead of a single-click and OK button.)
At the end of the questions you would
normally see a measurement window:
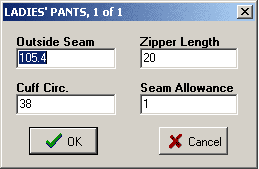
Try the macros first with standard
measurements. (Bust size 96 cm, 37 3/4"). When you want to make a
pattern for your own measurements, enter your measurements into each box
to replace the standard measurements. Press the Tab-key in the keyboard
to move to the next measurement box.
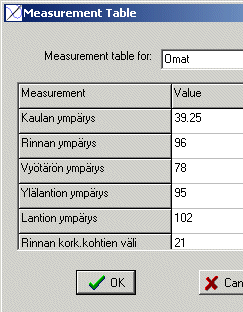
Measurement Tables (moved)
PatternMaker allows you to store
your measurements in a measurement table and use them with the macros.
This way you don't have to enter your measurements every time you want
to create a new pattern.  Read
more about using measurement tables. Read
more about using measurement tables.
NOTE! Decimals are always separated
by a dot moved.
In measurement tables and everywhere
in PatternMaker decimals are separated by a dot, never a comma.
Note to PatternMaker Basic users:
moved
Measurement tables can be saved in
all other versions of PatternMaker, except the free Basic version.
Read
about bypassing the measurement tables when you are using PatternMaker
Basic version.
Seam Allowances
If you want to print your pattern with seam allowances,
leave the seam allowance to 1 cm or 0.39", as given in the Measurements'
Window, or enter another meaurement. If you want your patterns without
seam allowance, type 0 (zero) into the seam allowance box.
If you want to add seam allowance at a later stage,
go to
Draw - Offset from the PatternMaker menu for equal seam allowance
everywhere, or
Draw - Seam Allowance
to specify varying seam allowances. Read more about using these commands
in
PatternMaker User's Guide
Once you have answered each question and entered
your measurements, the pattern will appear on the screen, based on the
specifications you made.
 Measuring
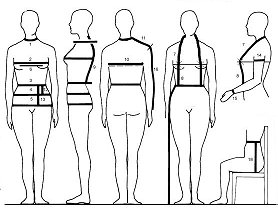
IMPORTANT Before you start using PatternMaker
macros, please familiarise yourself with the measuring instructions, as
you will need to take the measurements in correct places in order for
the patterns to work properly. Please go to
Measuring Tutorials
to learn more. Even experienced pattern cutters should have a look at
the measuring tutorial, as some PatternMaker measurements are taken differently
to what you may be used to.
Updates
From time to time updates are available to
download from our website. These include the latest versions and corrections
to PatternMaker and the macros.
Arranging patterns for printing
Before printing your pattern, ensure that the pieces
are close together and in a rectangular area, so that you don't end up
wasting paper on blank areas.
Moving patterns on the screen
 You
may move pattern pieces by selecting
Edit - Move or clicking the Move icon. You
may move pattern pieces by selecting
Edit - Move or clicking the Move icon.
After selecting the move command, left-click
the pattern piece you want to move to select it and then right-click
to accept the selection.
Now left-click a point anywhere, e.g. on
or within the selected piece to choose a move starting point, and move
the mouse. You'll notice that the piece starts to move. Move it to the
correct place, and left-click once again to finish the move.
To move several pieces together, left-click
each piece you want to move, then right-click to confirm the selection,
as before.
Removing pattern pieces
 If
you don't want to print all pattern pieces, you may remove the unwanted
pieces by selecting
Edit - Erase or by clicking the Erase icon. An alternative for
not to print all pattern pieces is to use command Print - Select or
Print - Area. If
you don't want to print all pattern pieces, you may remove the unwanted
pieces by selecting
Edit - Erase or by clicking the Erase icon. An alternative for
not to print all pattern pieces is to use command Print - Select or
Print - Area.
After selecting the erase command, left-click
the piece you want to remove to select it and then right-click
to accept the selection.
To remove several pieces,
left-click each piece you want to remove, then right-click to confirm
the selection, as before.
Printing (moved)
  When
you have your pattern pieces on the screen as you want them, go to
File - Print or click the Print icon. When
you have your pattern pieces on the screen as you want them, go to
File - Print or click the Print icon.
Activating the print command opens a
Print Preview Window. If all your pattern pieces are not visible,
press
F1-key in the keyboard to zoom in. Pressing the F1-key several
times will zoom in closer.
If you want to look at a particular area press
the
F2-key once or more, and pan the screen using the appearing arrows.
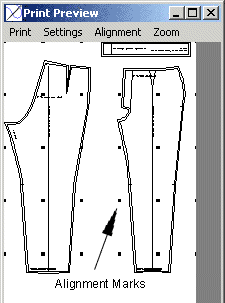
Small dots can be seen in the print preview. These
are
Alignment Marks
, which will be printed into the corners of each sheet to be used
as a guide for taping the pattern pieces together. By looking at the alignment
marks, you can tell how many sheets of paper you will need to print out
your pattern.
If the alignment marks are not visible, you may
turn them on by selecting Settings - Alignment marks. Here you
can also turn page numbering (Label pages) on or off. A tick indicates
a function is on.
Show Print Area
By going to File - Print Area - Toggle you
can see how your pattern will be printed on the sheets of paper. You may
turn the Print Area view on/off also by pressing the F12 key.
Use the move tool (see above) to place your pattern
pieces across as small number of sheets as possible.
The blue Print Area lines are visible only on the
screen - they won't get printed.
Undo
 When
you make a mistake and want to return to the previous step, go to
Edit -Undo to undo the last change, or click the Undo icon. When
you make a mistake and want to return to the previous step, go to
Edit -Undo to undo the last change, or click the Undo icon.
Normally you may stop a command before it is executed
by pressing the
Esc-key. As an exception, Erase command cannot be stopped by pressing
Esc. Instead, pressing Esc while the Erase tool is on will complete the
erase.
Grouping patterns
Pattern pieces in PatternMaker macros are grouped
so that each pattern piece, its seam allowance and any text stays
together when moving or resizing the pattern piece. Removing a grouped
piece will remove all of its details.
If you want to ungroup a grouped piece,
go to
Symbol - Ungroup. After selecting the Ungroup command, left-click
the piece you want to ungroup to select it, and right-click
to confirm the selection. Ungrouping a piece allows you to move or remove
each component independently.
If a command is grey
If a command is grey in a drop-down menu or its
icon is not visible, the previous command is still active. The name of
the command you are on is shown in green in the top right-hand
corner of the screen. Press the Esc-key once or twice to exit a command.
A new command may be selected when the name of
the command in the top right-hand corner appears in purple.
As long as the command name is showing in green,
it can be repeated. E.g. after using the erase command, while the command
is active ('erase' remains green), you may choose another piece to erase.
NOTE: Certain commands remain grey permanently
in the Basic or Deluxe version, because they are not available to use
with it.
Saving a Pattern
 To
save a pattern, go to
File-Save
as or click the Save icon. A Window appears for you to type a name
for your pattern, and choose the folder where you want the pattern to
be stored. Once you have typed a name and specified a folder, click 'Save'. To
save a pattern, go to
File-Save
as or click the Save icon. A Window appears for you to type a name
for your pattern, and choose the folder where you want the pattern to
be stored. Once you have typed a name and specified a folder, click 'Save'.
To open the same pattern later, go to File-Open.
The same Window appears. Find the folder where you saved the pattern into.
Click the pattern's name to high-light it, then click 'Open'.
Emptying Drawing Area
If you want o empty the drawing area and get a
new blank page, go to File-New. The progam will ask you whether
you want to save the current page/pattern (Save Noname.pat?). Click 'Yes'
to save, or 'No' to discard the page without saving.
PatternMaker Drawing and Manipulation
tools
You may draw any kind of shape using PatternMaker
CAD-tools available in PM Home, Expert and Marker versions.
You may draw lines, curves, rectangles, polygons and circles. You may
cut and join pieces, move individual points on any piece, and rotate pieces
and points. All this can be done either visually (by eye) or numerically
to an exact measurement by typing a distance or measurement using the
keyboard.
You may resize pieces both proportionally or in
one direction only. This function is extremely useful when making patterns
for
elastic fabrics and you want to take the stretch of the fabric
into account.
The resize function is useful also when you want
to print patterns in
miniature size. It is a good idea to print a miniature pattern
over a section of the actual pattern. When using the pattern later it
is easy to see what kind of pattern is at hand.
Using the Drawing and Manipulation tools you may
transform the existing macro patterns as you wish, and create your
own designs from the basic patterns.
 Quick
Reference Guide Quick
Reference Guide
You may open a Quick Reference Guide on the PatternMaker
screen by selecting Settings - Configure - Status Bar. The Quick
Reference Guide allows you to read and learn basic functions in PatternMaker
simultaneously.
You may move the Quick Guide Window on the screen
by placing the mouse cursor over the title bar (usually blue) and dragging
it (with you mouse-button pressed down) into a new position.
Take a look at PatternMaker other tutorials next!
To learn how to use the drawing and manipulation tools, move on to
PatternMaker User's
manual. On this site there also is available an
applied tutorial with about 30 real-life design exercises. After
you have learned to use the program-s CAD tools, please look at these
design exercises.
Well done on finishing the Quick Guide!
| 