|
Sewing Instructions For Men's Garments
Copyright ©1998-2000 Leena Lähteenmäki,
Järvenpää
Sewing instructions:
Measurements
Measuring and fitting are generally
simpler for men's wear than for ladies' garments. Body shapes
are simpler, fit is looser and there are fewer measurements. See the
measurement chart for the measurements you will use for the men's macros.
We suggest you make a fitting muslin at least when sewing the first
jacket or vest. If you don't, you can provide for alterations
after the garment is complete by adding extra seam allowance.
Ease
We do not include an ease chart for
the men's garments because it is usually not necessary to make many
ease adjustments for men's garments. Remember that the macros automatically
add fitting and styling ease.
General Sewing instructions
All the basic instructions for making and sewing
patterns from macros are on
 the general sewing instructions
page.
The instructions on this page contain
additional information you need to sew the men's macro set.
Pants can be sewn according
to sewing
instructions for ladies' pants.
the general sewing instructions
page.
The instructions on this page contain
additional information you need to sew the men's macro set.
Pants can be sewn according
to sewing
instructions for ladies' pants.
Sewing a shirt
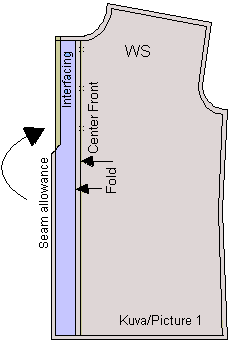
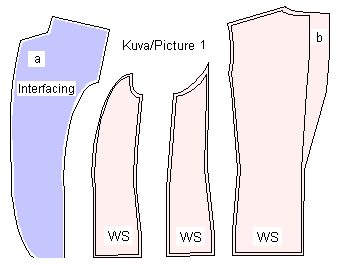
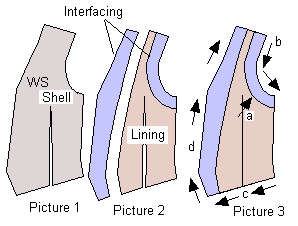
Iron interfacing on button extension. Fold seam allowance
at front edges inwards 1/2 inch (1 cm) and baste (Picture 1). Fold again
with right side of fabric inside, along button extension fold lines.
Stitch button extensions across bottom edges (Picture 2). Turn
button extensions out and sew along folded seam allowance edge on wrong
side of fabric.

Sew buttonholes. Sew on buttons.
If you sew breast pockets to the shirt, iron interfacing
to breast pockets. Fold seam allowances inwards and topstitch
pocket mouth. Sew pocket in place, edgestitching it simultaneously.
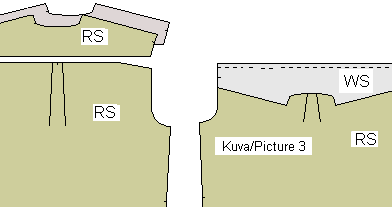
Fold the back piece pleat according to marks and baste.
Place yoke pieces right side against right side and sandwich the back
piece between the yoke pieces (Picture 3) . Sew through all thicknesses.
Open the seam and iron.
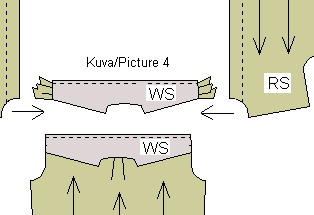
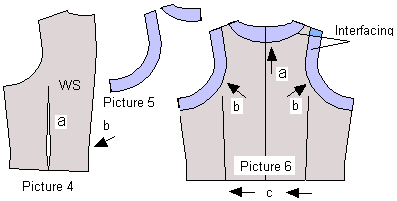
Fold the back piece between the yoke pieces. Then fold
the front pieces between the yoke pieces, wrong sides of the yoke pieces
out (Picture 4). (It is a bit tight, but you can manage). Sew along
the front shoulder edges of the yoke through all thicknesses. Turn the
pieces to their right position and iron. Edgestitch the seams.
Join sleeves to shell, right sides together (Picture
5). Overlock and iron the seam allowances towards the shell.
Edgestitch the seams.
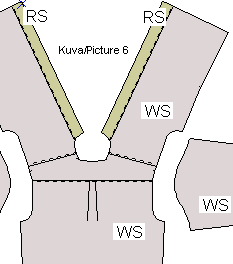
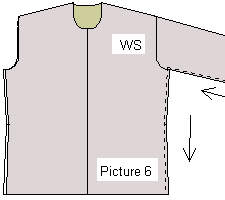
Sew sleeve seam and side seam continuously from sleeve
cuff to shell hem (Picture 6) . Overlock and iron.
Use
general instructions
to attach collar and sleeve cuffs. Fold hem allowance twice and
sew. Sew buttonholes. Sew buttons on button extension and on collar
stand.
SEWING A JACKET
When cutting the pieces, do not add seam allowance to pocket mouth.
Iron interfacing to jacket's front facing and back neck. Interfacing
is also ironed to under collar and pocket welts or flaps.
If you want the jacket to be very "stiff," iron interfacing
to jacket's front piece as well. It is also good to iron interfacing
to jacket's hem - set it in just beyond the hem seam allowance.
Only vertical body seams need to be overlocked. Collar, shoulder and
sleeve seams do not need to be overlocked. Press all seams after
sewing and overlocking them.
Add extra width for a pleat to the back lining piece (Picture 1).
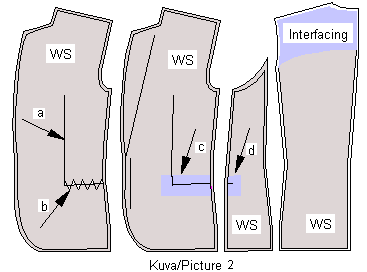
Sew front waist dart (Picture 2a). Stitch pocket mouth edges
together with temporary zigzag stitches (Picture 2b). To
strengthen pocket mouth, iron interfacing to its wrong side (Picture
2c). Do the same with the section of pocket mouth on the
side panel (Picture 2d). Sew front piece to side panel, right
sides of material together.
How to sew pockets is instructed in the
general sewing instructions
. The kind of pocket openings to use, and exactly where to place
them, are styling decisions for you to make. If you sew a patch
pocket at hip, place it so that it covers the zigzagged pocket mouth.
Attach welt, buttonhole or flap pocket onto zigzagged pocket
mouth .
-
Sew back pieces to front/side piece and back seam,
right side against right side.
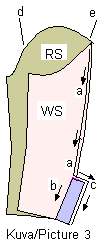
The sleeves come in two pieces, top and bottom.
Place bottom piece on top of upper sleeve, right side against right side,
and sew from corner of sleeve cap to where button placket begins (Picture
3a). Continue from there basting along the button placket fold line
(Picture 3b). Then sew around button placket (Picture 3c). Press button
placket under upper sleeve and remove basting. Fold inside and press
seam allowance at cuff. Check that length of sleeves is correct, then
sew buttons on button placket. Sew them through all layers of fabric.
Buttonholes are optional.
Easestitch sleeve cap, allowing a seam allowance of
1/4 inch (1/2 cm) (Picture 3d-e ). Sew front seam of sleeves. Turn
sleeves right side out and jacket wrong side out. Place sleeves
inside jacket (right side against right side) so that sleeves' shoulder
marks match with jacket shoulder seams. Insert sleeves by sewing along
easestiches Adjust ease by pulling on the stitching in the ease
cap. Sew sleeve cap to jacket. If there tends to be too much
ease at sleeve cap (some fabrics tolerate more ease than others do), you
can adjust this by placing sleeves lower at armpit. There should
be as much ease as possible, but no wrinkles at cap seams, when done.
HINT: In the advanced tutorial I give instructions of how to use a
facing in sleeve cap which helps to get nicely formed sleeve heads.
Click here
.
When cutting collar pieces, cut upper collar about
1/4 inch (1/2 cm) bigger at outer edges. This forces the collar
to turn down to its correct position when it is done. Place under
collar on upper collar, right side against right side, and sew along edges
Picture 4). Trim seam allowances and cut corners before turning the
collar right side out. Turn collar right side out and press.
Edgestitch.
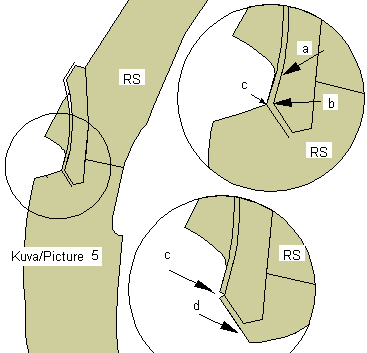
Place collar on jacket neckline, with
right side of under collar piece against jacket's right side. Sew
from shoulder (Picture 5a) to lapel corner (Picture 5b). Cut jacket's
neck seam allowance at corner (Picture 5c).
Now turn jacket's lapel under the collar
and sew from lapel corner to lapel notch mark (Picture c-d). After
having sewn both ends of collar to lapels, attach the rest of the collar
to jacket's back neck. If you have difficulties in this (collar
will be a bit longer than neck), first Easestich jacket neck at distance
of normal seam allowance.
The entire lining is assembled separately as follows,
then attached to the rest of the jacket as a unit. Sew lining's back seam
at edge. Baste extra width along back center seam to make a soft
pleat. Iron the pleat, then remove the basted stitches.
Sew front pieces of lining to side panels and front/side
pieces to back piece. Fold hem of lining in twice and sew.
The lining should be an inch or so (about 2 cm) shorter than the jacket
when done. attach jacket's front facing to lining's front edges, right
side against right side. Sew shoulder seams. Attach
sleeves to lining as you did with jacket shell.
To join jacket and lining, place the lining on top
of the jacket with right side against right side. Leave collar
in between and upside down. Sew a continuous seam as follows: across
hem of front facing, along one front edge, around neck to other
front edge and finally across other front facing. Leave jacket hem
open. Snip seam allowance at starting point of lapels and at neck seam
at about 1 inch (2 cm) intervals. Cut corners diagonally (including
at front of hem) so that you will be able to turn it right side out..
Turn lining inside jacket. Open seams well and press. Edgestitch.
Attach lining to sleeve ends.
Sew hem with invisible stitches. Sew buttonholes.
Sew on buttons. Do the final pressing.
SEWING VEST
 The
following uses a rare and ingenious way of lining a vest, which we have
been very pleased with. The same method can be used for lining
ladies' and children's vests. The
following uses a rare and ingenious way of lining a vest, which we have
been very pleased with. The same method can be used for lining
ladies' and children's vests.
Vests are made with both a lining and a shell.
For vests that are worn with a jacket, both shell and lining in back are
usually made of lining material. Iron interfacing to front facing and
to armscye facings.
Zigzag armscye facings onto linings, wrong side of
facings against right side of the lining (Picture 3a).
Sew darts closed on front shell (Picture 1) and lining.
Sew front facing to front lining right side against right side (Picture
2). Place front pieces onto linings, right side against right side and
sew armscye seams (Picture 3b). Leave side seam raw and sew bottom
(Picture 3c) and front edges (Picture 3d). Leave shoulder seam raw.
Turn front pieces right side out and press seams well. Edgestich
armscyes, bottom and front.
Sew back darts closed on back shell and
lining (Picture 4a). Sew back seam of back shell and lining (Picture 4b).
Iron interfacing to back neck facing and armscye facings (Picture
5). Zigzag facings onto neck (Picture 6a) and to armscyes (Picture
6c) of back lining, with their wrong side against lining's right
side. Place back piece of shell onto back piece of lining, right
sides together, and sew along hem (Picture 6c). Leave all other
seams raw. Turn back piece right side out and press hem seam well.
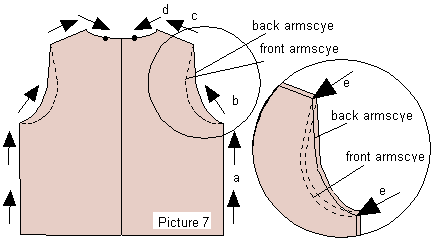
Sandwich front pieces between back piece and back lining
as follows: Place front pieces between back piece and back lining.
Right side of front piece is against right side of back and right side
of front lining is against right side of back lining. Pin side and
shoulder seams through all layers of fabric. Sew a continuous seam
along side seam (Picture 7a), back armscye (Picture 7b), shoulder (Picture
7c) and part of neck (Picture 7d). When you come to corners feel the place
where front and back pieces meet with your fingers and stop sewing exactly
on that place (Picture 7e).
Sew other side seam, armscye, shoulder and part of
neck same way. This way, you sew the front and back side seams and shoulder
seams simultaneously. Sew other side of the vest similarly.
Leave part of neck unsewn, as instructed. It will form a hole at the back
neck for turning the vest right side out.
Turn the vest right side out. Close
hole at back neck by hand. Sew buttonholes. Sew on buttons.
Edgestitch if desired. Do the final pressing.
| 