Copyright ©1998-2000 Leena Lähteenmäki,
Järvenpää
Lasten vaatteiden ompeluojeiden suomenkielinen
versio tulossa
J os haluat saada sähköposti-ilmoituksen,
kun tämä sivu on saatavilla suomeksi, pyydä sitä sähköpostitse.
Ompeluohjeita sisältävät sivut
Naisten vaatteet
|
Miesten vaatteet |
Lasten vaatteet
| Naisten alusvaatteet
|
Äitiys- ja imetysvaatteet
| Ompeluprojektit
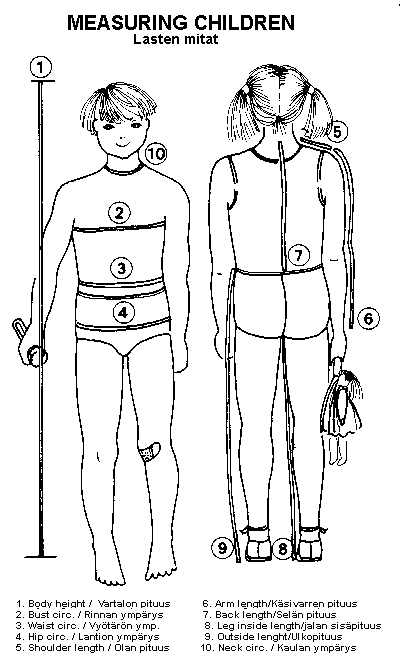
Measurements
It's not usually necessary to take full measurements for
baby clothes. A
picture
instructing the measuring is included for cases when custom measurements
are required.
First, the macro asks you to choose a standard size based
on your baby's height. You have to choose a size even if you plan to type
in custom measurements. Select the choice that is closest to your
subject's height. The next dialog box shows you the standard measurements
for that height. (Some of the macros have two dialog boxes for measurements.)
To accept these measurements, just click the "OK" button.
If you want to use custom measurements instead, enter the correct numbers
and then click "OK".
Ease
We do not include an ease chart for the babies' garments
because it should not be necessary to adjust ease much for babies' clothing.
Baby clothes are deliberately designed for a loose fit. Some macros
give you a choice of "Normal" or "Wide" ease, and
some select the ease automatically. Wide eases are for garments
with very loose fit, or for outer garments that are to be worn over other
clothes. Enter the correct measurements, and the macro will add
the ease.
Sewing a T-shirt
Check that waist, neck and cuff ribbings are of suitable
length. The correct length depends on how elastic the ribbing fabric
is.
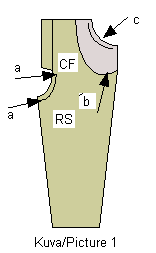
WS= nurja puoli
RS = oikea puoli
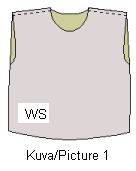
Sew and overlock shoulder seams with right sides together
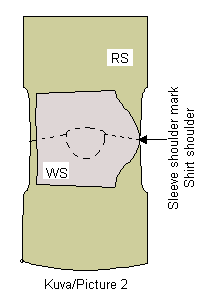
(Picture 1). Join sleeves to shell, right sides together (Picture 2).
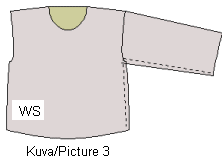
Overlock. Sew sleeve seam and side seam continuously from sleeve
cuff to shell hem, right sides together (Picture 3). Overlock.
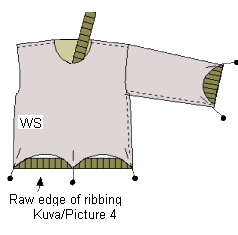
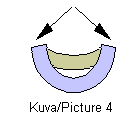
Sew ends of waist ribbing together, to form a ring.
Fold lengthwise in two, wrong side inside. Divide the circumference
of the ring into four equal parts and mark them with pins through both
layers on the cut edges. Do the same with the bottom of the shell.
Then pin together corresponding marks and stitch (Picture 4), stretching
the ribbing to fit. Shell should be inside out now, and the
ribbing is inside it. Sew and overlock. Attach neck and cuff
ribbings in the same way.
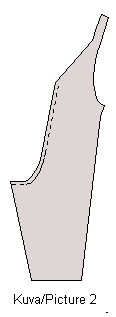
Sewing a dress
The dress illustrated is constructed with a placket in
front. Variations can use buttons or a back closure (zipper or buttons).
If you want to sew a collar on the dress, refer to
general sewing instructions
and leave out the neck facings.
WS= nurja puoli
RS = oikea puoli
Interfacing = tukikangas
Center front , CF = Keskietu, KE
Center back, CB = Keskitaka, KT
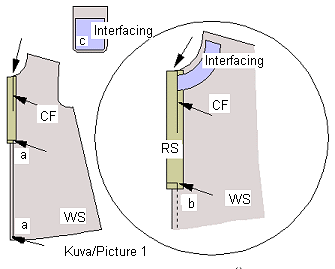 Sew
front center seam from hemline to where the button placket begins (Picture
1a). Fold button placket right side inwards and sew bottom edge from
fold to center front . Cut seam allowances diagonally here (Picture
1b). Sew
front center seam from hemline to where the button placket begins (Picture
1a). Fold button placket right side inwards and sew bottom edge from
fold to center front . Cut seam allowances diagonally here (Picture
1b).
Iron interfacing to pocket pieces (Picture 1c). Turn
seam allowances inwards and baste. Topstitch top of pocket.
Sew pockets to their places on front pieces simultaneously edgestitching
them. The exact location of the pockets is a styling decision
for you to make.

Sew and overlock shoulder seams (Picture 2a) and side seams
(Picture 2b), right sides together.
Easestitch sleeve cap with normal seam allowance (Picture
3a). Sew and overlock sleeve seams. Turn shell wrong side out and
sleeves right side out. Place sleeves inside shell (Picture 3b)
and match sleeve shoulder marks with shell's shoulder. Pull the
ends of the edgestitching threads to gather ease in. Sew and overlock.
 Sew
front and back neck facing pieces together at the shoulder (Picture 4).
Place facing on neck of shell, right sides together. Fold
front button placket, right side inwards, under the facing. Sew
placket to facing. Snip seam allowances at 3/4 inch (2 cm)
intervals and turn facing inwards. Edgestitch or stitch through
seam allowances only near seam. Strengthen
bottom of button placket with diagonal stitch line thorough all thicknesses
on right side Sew
front and back neck facing pieces together at the shoulder (Picture 4).
Place facing on neck of shell, right sides together. Fold
front button placket, right side inwards, under the facing. Sew
placket to facing. Snip seam allowances at 3/4 inch (2 cm)
intervals and turn facing inwards. Edgestitch or stitch through
seam allowances only near seam. Strengthen
bottom of button placket with diagonal stitch line thorough all thicknesses
on right side
Sew and attach sleeve cuffs according to
general sewing instructions
. Fold hem allowance twice and sew. Sew buttonholes. Sew on
buttons.
Sewing a shirt
For the body of the shirt, follow the sewing instructions
for
man's shirt
. Use
general sewing instructions
to attach collar and sleeve cuffs. Fold hem allowance twice and
sew. Sew buttonholes. Sew on buttons.
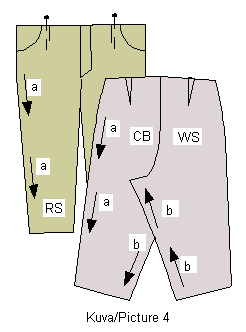
Sewing pants
Sew center seam at crotch from leg to where zipper placket
begins (Picture 1a). Attach zipper according to
general sewing instructions
. Place pocket lining on top of pants pocket corner, right
sides together Picture 1b), and sew along pocket mouth (Picture
1c).. Snip seam allowance at intervals of about 3/4 in (2 cm).
Turn facing inside and topstitch pocket mouth twice.
WS= nurja puoli
RS = oikea puoli
Center front , CF = Keskietu, KE
Center back, CB = Keskitaka, KT

Place pocket side body piece under pocket lining piece
edges matching (Picture 2). Sew and overlock along round and bottom
edges. Pocket side seams are attached to the pants' side seam when
sides are sewn.
Sew back waist dart. Sew center back seam, with elastic
stitches if possible (Picture 3).
Place front and back pants on top of each other, right
sides together, and sew along side seams (Picture 4a) and leg seams continuously
from cuff to cuff (Picture 4b).
Fold front pleats soft and pin. Attach waist band
according to
general sewing instructions
.
Fold cuff seam allowances twice and sew. Sew button
and buttonhole on waistband.

 PANTS
VARIATIONS: PANTS
VARIATIONS:
For pants with elastic waist band use pants' macro version
2, (bpants2.mac, cpants2.mac). Omit zipper and back darts. Sew ends
of waistband together to form a ring. Overlock one long edge
and sew other edge to pants waist, right sides together. Press seam allowance
upwards. Fold waist band horizontally in two and sew along previous
seam line. Leave a hole for inserting a rubber band. After
inserting a rubber band close hole.
If you want to sew jeans (cjeans.mac, only for children
over 2 years), sew and overlock back yoke's back seam and back pant's
back center seam. Sew and overlock yoke to pants, right sides together.
Topstitch seam twice. Put decorative stitching, if desired,
on back pockets now and then attach them. Topstitch leg seam (from cuff
to cuff) twice. To be able to do this, sew side seams only after
you have done this. Otherwise follow sewing instructions for normal
pants above.
Sewing a Sweat shirt (see illustration for
T-shirt)
 Sew
side pockets to front pieces according to
general sewing instructions
. For the body of the Sweat shirt, follow the instructions for
T-shirt but do not attach ribbings. Sew
side pockets to front pieces according to
general sewing instructions
. For the body of the Sweat shirt, follow the instructions for
T-shirt but do not attach ribbings.
Sew and attach hood according to
general sewing instructions
. Make small buttonholes in front piece, on both sides of center
front and 2 - 1/2 inches (6 cm) from bottom edge. These are the
holes for the drawstring. Strengthen buttonholes by ironing interfacing
to wrong side of fabric, then sew buttonholes. Fold hem allowance
inwards 1 - 1/2 inches (4 cm) and sew on right side with twin needle to
form a tube for drawstring.
Fold sleeve ends inwards and sew on right side with twin
needle.
Sewing a vest with hood
 Overlock
all edges of yoke pieces for shoulder and neck seams. Do the same
with the front piece edges to which yoke is to be joined. Fold button
plackets of front yoke inwards along fold line. Fold front piece's
yoke seam allowances inwards and baste (cut seam allowance diagonally
at corners to allow it to fold). To strengthen the corner to be cut, sew
line of stitches around corners at width of seam allowance from edge.
Place yoke pieces are on top of each other so that their center fronts
match (= button plackets on top of each other). Then place front piece
on top of the yoke. Baste and sew yoke to front piece, simultaneously
edgestitching it. Overlock
all edges of yoke pieces for shoulder and neck seams. Do the same
with the front piece edges to which yoke is to be joined. Fold button
plackets of front yoke inwards along fold line. Fold front piece's
yoke seam allowances inwards and baste (cut seam allowance diagonally
at corners to allow it to fold). To strengthen the corner to be cut, sew
line of stitches around corners at width of seam allowance from edge.
Place yoke pieces are on top of each other so that their center fronts
match (= button plackets on top of each other). Then place front piece
on top of the yoke. Baste and sew yoke to front piece, simultaneously
edgestitching it.
Sew and overlock shoulder and side seams of shell and armscye
facings. Place facings onto armscyes of shell, right sides together.
Sew and overlock. Snip the seam allowances at 3/4 inch (2 cm) intervals.
Turn facings inwards and edgestitch. Hand sew facings with small
stitches to shell's shoulder and side seams.
Sew and attach hood according to
general sewing instructions
. Make small buttonholes in front piece, on both sides of center
front and 2 - 1/2 inches (6 cm) from bottom edge. These are the
holes for the drawstring. Strengthen buttonholes by ironing interfacing
to wrong side of fabric, then sew buttonholes. Fold hem allowance inwards
1 - 1/2 inches (4 cm) and sew on right side with double needle to form
a tube for drawstring.
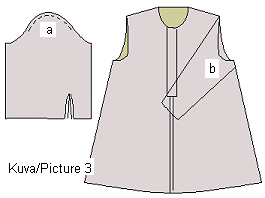
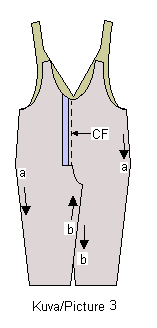
Sewing a bibsuit (overall)
 Iron
interfacing to outer half of the button plackets and pocket pieces. Iron
interfacing to outer half of the button plackets and pocket pieces.
Sew front center seam from leg seam to where button placket
begins (Picture 1a ). Fold button placket right side inwards and sew bottom
edge from fold to center front (Picture 1b). Cut seam allowance
diagonally at center front(Picture 1c). Turn out. Place button
plackets on top of each other, center fronts matching, and sew over
bottom edge though all layers of fabric.
Turn the seam allowances of the pocket pieces inwards and
baste (Picture 1d). Topstitch pocket mouths. Sew pockets to
their places on front pieces, simultaneously edgestitching them.
Center front , CF = Keskietu,
KE
Center back, CB = Keskitaka, KT
Sew back center seam, with elastic stitches if possible
(Picture 2).
Place front and back pieces on top of each other, right
sides together. Sew side seams (Picture 3a). Sew leg seam
continuously from cuff to cuff (Picture 3b).
Iron interfacing to the wrong sides of the facings. Sew
side seams of facings.
Start here = aloita tästä
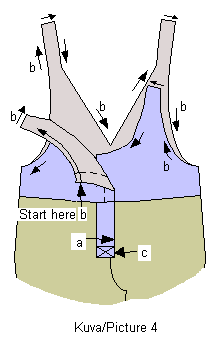 Fold
button placket along folding line, right sides together (Picture 4a).
Place facings on it on overall's neck, right sides together. Sew along
top edges continuously from center front, around shoulder strips and along
armscyes to back shoulder strips etc. (Picture 4b). Fold
button placket along folding line, right sides together (Picture 4a).
Place facings on it on overall's neck, right sides together. Sew along
top edges continuously from center front, around shoulder strips and along
armscyes to back shoulder strips etc. (Picture 4b).
Snip the seam allowance along the curved section at intervals
of about 3/4 inch or 2 cm. Cut corners of seam allowances.
Turn facings and shoulder strips inside and edgestitch.
Strengthen bottom of button placket with diagonal stitch lines thorough
all thicknesses on right side (Picture 4c)
Sew buttonholes to back shoulder strips. Sew buttons on
front shoulder strips.
Fold leg ends two times and sew.
If you sew an overall with sleeves follow the sewing instructions
for T-shirt to sew top part of the overall. For patterns with hoods, attach
hood according to
general sewing instructions
. Attach sleeves according to instructions given for T-shirt.
|
